Many customers are making the move from their on-prem exchange server to Office 365. Migrating from this environment can take some time depending on your bandwidth even when using a 3rd party tool like BitTitan or Skykick. For this reason, my number one recommendation for these types of environments is to prepare weeks in advance. These 3rd party tools allow us to perform a “prestage migration” in which we can bring over a bulk of the data before actually cutting over MX records to point at Office 365. In this article, i am going to give you best practices to follow using the BitTitan migration tool.
**Please Note** This is a highly level overview of the migration steps using BitTitan. For a complete step-by-step guide with screenshots, follow this link. While this guide is specific to BitTitan the same concepts can be followed using any tool.
Set Up the Destination Environment
CheckList:
Provision a Net New Tenant in Office 365
- They will be provisioned with the .onmcirosoft domain
- This can be purchased directly or under the CSP model through a distributor
In 365 Admin Center, Go to Setup>Domains>Add Domains
.
- Add the domain and verify with a TXT record
Add Users and Apply Licenses
- Add One at a time
- Bulk Upload via Powershell
- Bulk Upload Via CSV
- AD Connect Setup
#Bulk Import Users with Passwords Powershell#
Prepare the Source Environment
CheckList:
Set Impersonation rights for the admin user
Open the exchange shell on the exchange server and run the following cmdlet in powershell:
New-ManagementRoleAssignment -Role ApplicationImpersonation -User <admin_user_name>
Disable the Throttling Policy on Exchange, refer to KB article for particualr environment
Link in Title. This is only relevant for Exchange 2010+. Exchange versions 2007 and earlier do not have throttling policies.
Audit Upload Speeds
Our bandwidth is often limited in Exchange environments. Auditing upload speeds will give us a better idea of how long the migration will take
Upgrade Software on Workstations
If applicable, install the latest Office 365 software to all users workstations
Set Up A BitTitan Account
Create a Login
Click the Link to create a BitTitan username and password.
Create a Customer
Enter Primary Domain name and customer name
Send Out Agent to Re-configure Outlook Profiles
CheckList:
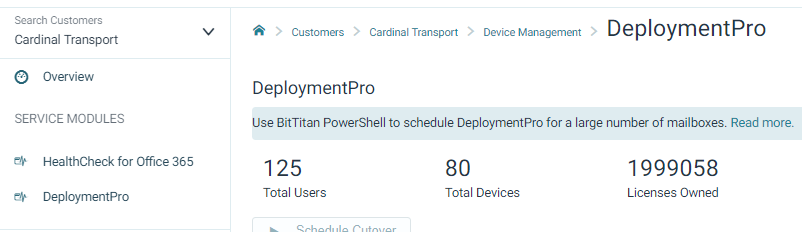
*NOTE* BitTitan comes with a tool called Deployment Pro which re-configures Outlook profiles after the migration. This can be pushed out either through GPO or email.
Determine whether sending out agent via GPO or Email
Track Users with Agent Installed
Devices will register and match users email address to computer in a one-to-one relationship. Each computer will have a "Heartbeat"
Prepare Migration Endpoints
CheckList:
Set up your source and destination endpoints in the BitTitan Portal
- The source endpoint can be found under “Exchange Server 2003+
- Destination is Office 365
- Provide Admin Credentials
Autodiscover Users
- Clean Up User List as Needed
- Remediate UPN issues by clicking on Pencil icon next to users
Verify Credentials
- This will tell you if there are errors
- Most Typical Errors are Insufficient Impersonation rights, wrong admin creds
- Shows “Completed Verification” upon success
Subscribe Users
- Select All Users>Click last Icon on top toolbar with 3 lines
- “Apply User Migration Bundle”
- Takes a 3-5 Minutes to propagate
Determine the Maximum number of Concurrent Migrations
- If you attempt too many concurrent migrations the server will time out and all threads will fail
- Guideline=3 per 1Mbps of Bandwidth
- In BitTitan portal, Go to Edit Project>Advanced Settings>Set Maximum # of Concurrent Migrations
- Audit to find sweet spot once you kick off Migration
Start Migration/Define MX Cutover
CheckList:
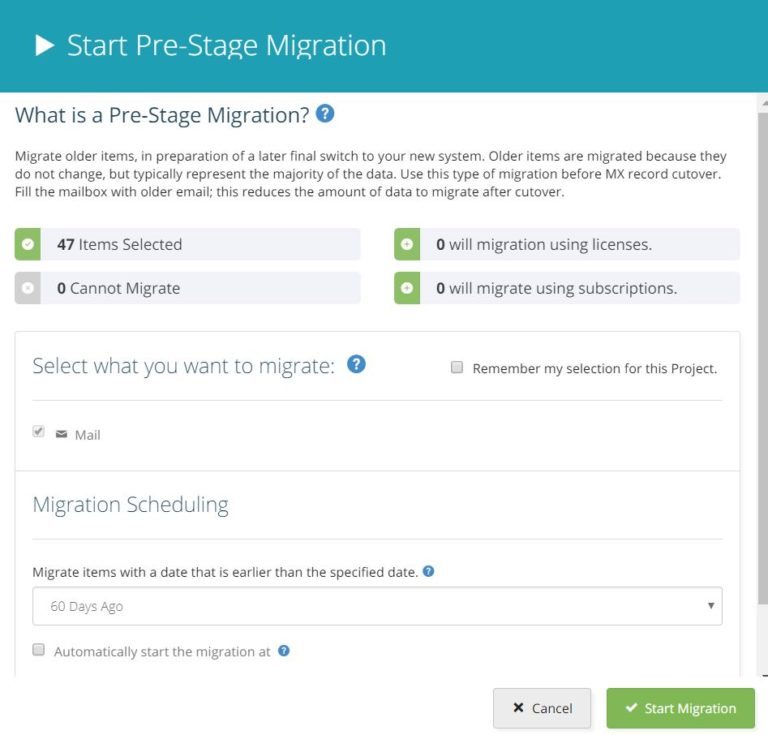
Run Prestage Pass bringing mail from Exchange Server to Office 365
- This will bring over a bulk of the data before MX cutover
- Set Prior to 60 days
- Any user whose status changes to “Failed” is almost 100% due to server timeout. Adjust your max # of concurrent migrations and rerun these users
Define MX cutover Time to 365
- Preferably Non-Business Hours
- Go to 365 Admin Center>Setup Domains to find MX Record you will need to change
- This format should follow: Domain-com.mail.protection.outlook.com
- Take note of any 3rd partner connectors for email filtering: Symantec, Barracuda, etc. Look up necessary steps for creating connectors in 365. These providers usually have step-by-step guides you can google
Full Migration Pass/MX Cutover
Checklist:
Run Full Pass to bring over remaining Mail, Calendars, Contacts, Notes, Rules
- This shouldn’t take long as long as pre-stage pass completed
- Once Full Stage Completes, you can run up to 10 delta passes to collect any residual mail
Switch MX Recods
- Point records at 365
- DO NOT green light this step if there is still a lot of data to move over
- Test Inbound/Outbound Mailflow
Post-Migration Clean Up
Checklist:
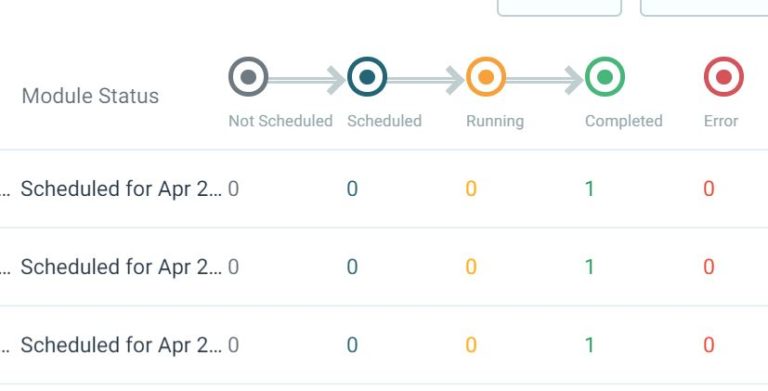
Make Sure DMA Agent Ran Successfully
- DMA status will go into “Completed” after succesfull authentication by end user
- Any user that fails authentication 3x will go into an “error” status
- These users you will need to reschedule and make sure they have the correct 365 password