Token theft is one of the fastest growing attack methods. Lately, I talk to one customer or MSP a week that has had some form of breach that involved this attack which extended into business email compromise. In today’s post, I am going to provide you my recommended incident response playbook that you can leverage to return an environment to a healthy state post-breach. Next week, Ill release an article going over the proactive posture management you should have in place to prevent this type of attack altogether. I will be bucketizing these recommendations across parts of the NIST CSF framework (Detect, Respond, Recover).
Sign Up For My Token Theft Webinar
Understanding the Attack Kill Chain
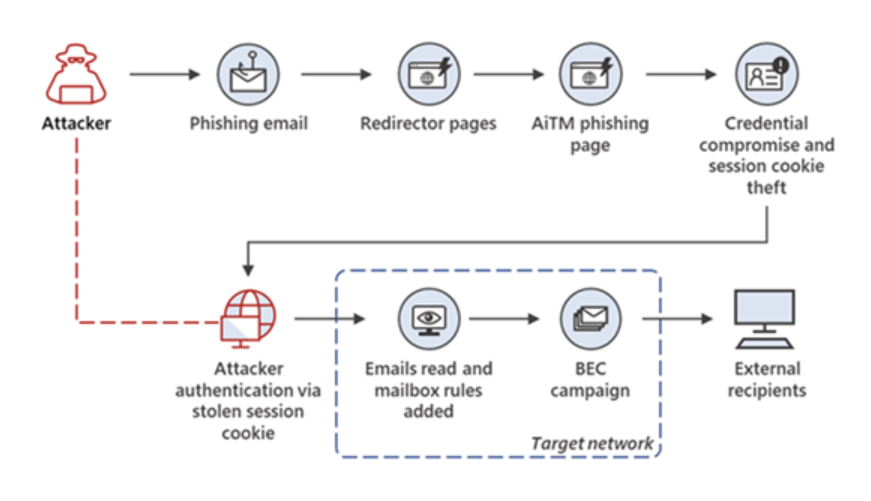
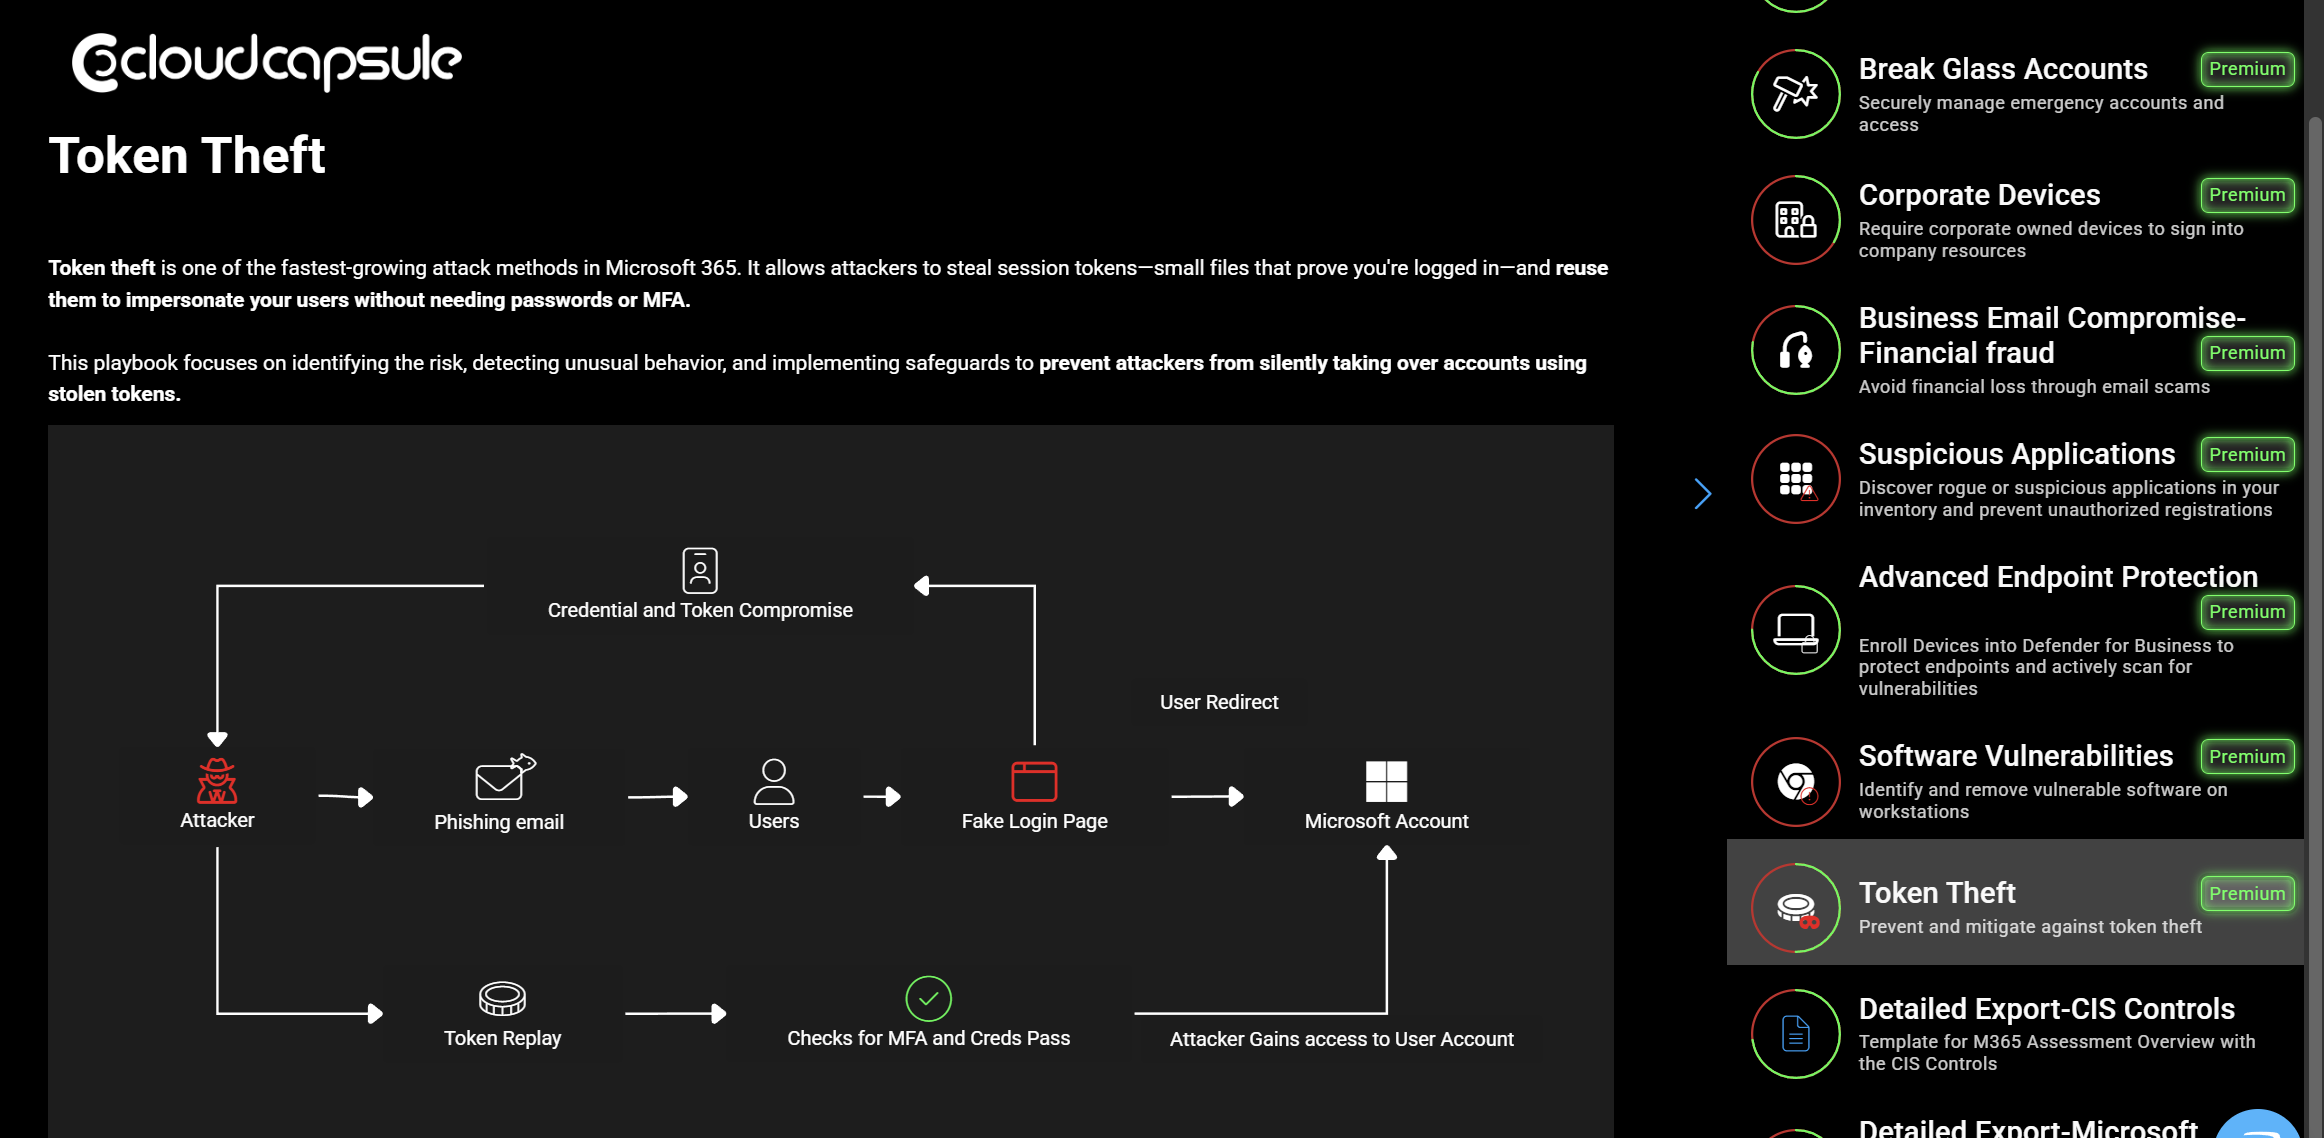
There are multiple ways token theft can occur but in this playbook we will look at one of the most common methods initiated by a phishing email to a user. This email contains a link that takes a user to a legitimate looking Microsoft login page where the attacker can harvest session tokens. From there, the attacker can leverage those token to perform some campaign that will involve business email compromise.
Detect
How you are notified and/or alerted on the incident could come from a variety of different sources. You may also be brought in at various parts of the attack kill chain. (i.e. You may get an alert that an inbox rule was created that you investigate vs a user signing in from an odd location). The following are some common triggers that would activate this incident response plan:
- User Reports suspicious or malicious behavior => This is less common but the user could end up reporting suspicious activity with their account or an email with a link they clicked on. Other users may report suspicious activity based on a continued BEC campaign.
- Entra ID/Sign-In Alerts => if you are leveraging first party Microsoft solutions or 3rd party, the sign in logs are one of the greatest sources to identify suspicious sign ins that are related to these types of attacks.
- Defender/Email Alerts => There could be various alerts you have coming from defender that relate back to the incident such as the creation of inbox rules, extreme volumes of email coming from one user, potentially malicious URL clicked, etc.
Ensure Defender is Set to send Alerts to PSA/Ticketing System
In the Defender Admin Center, go to Settings>Microsoft Defender XDR
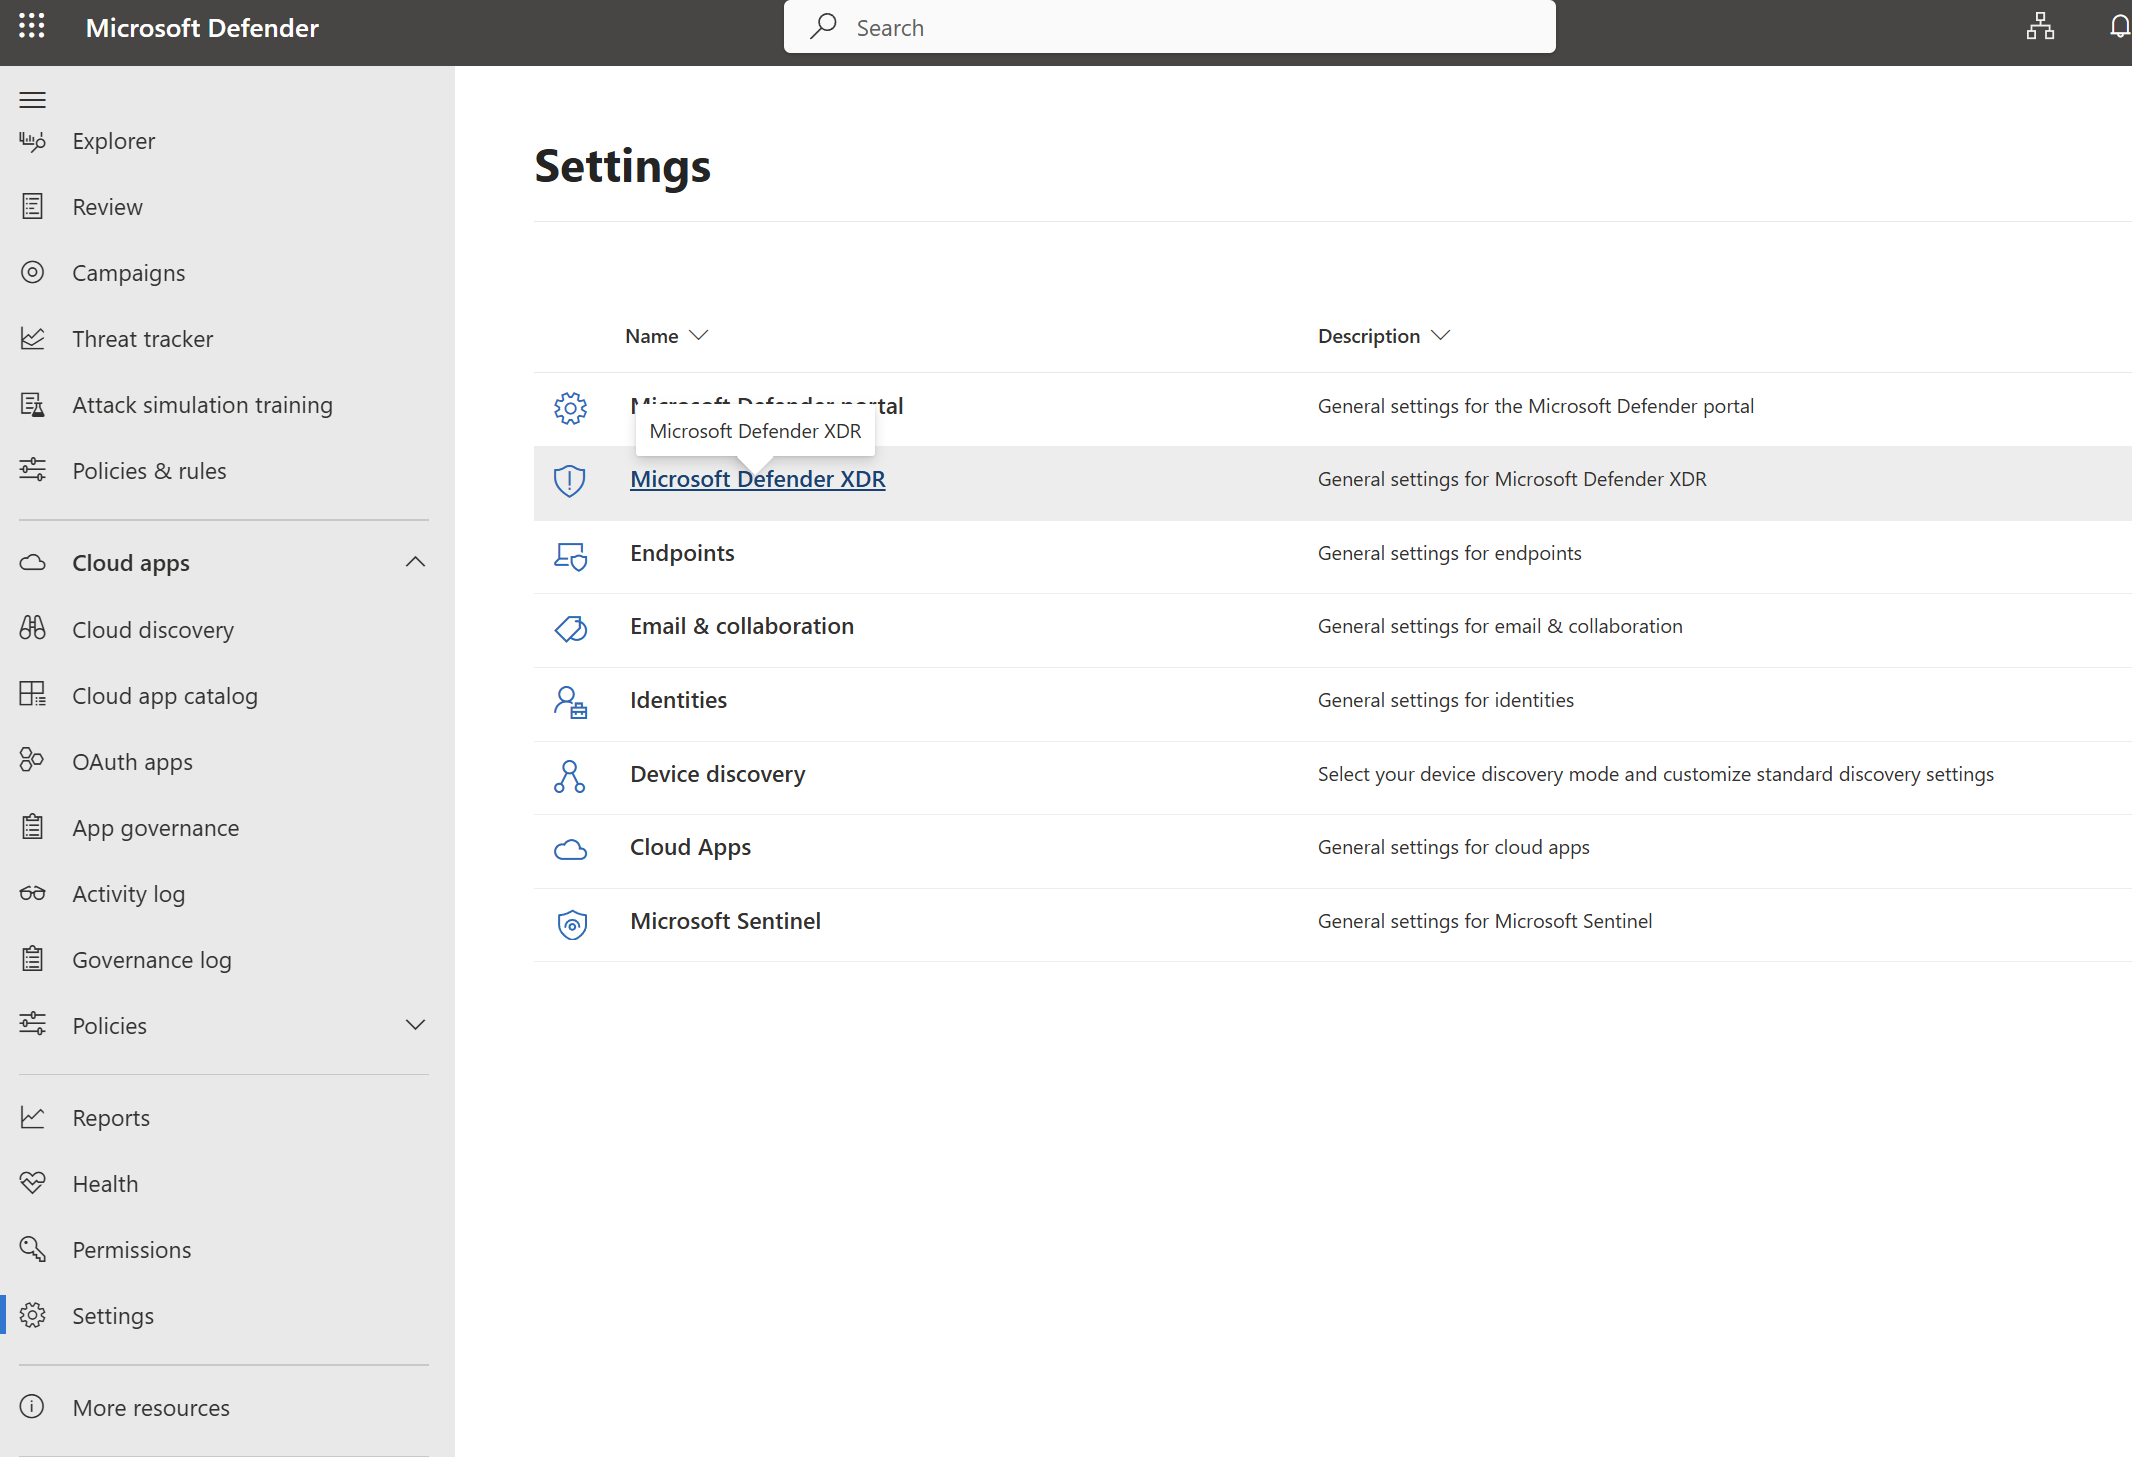
Click on email settings. Modify the existing rule or create a new rule
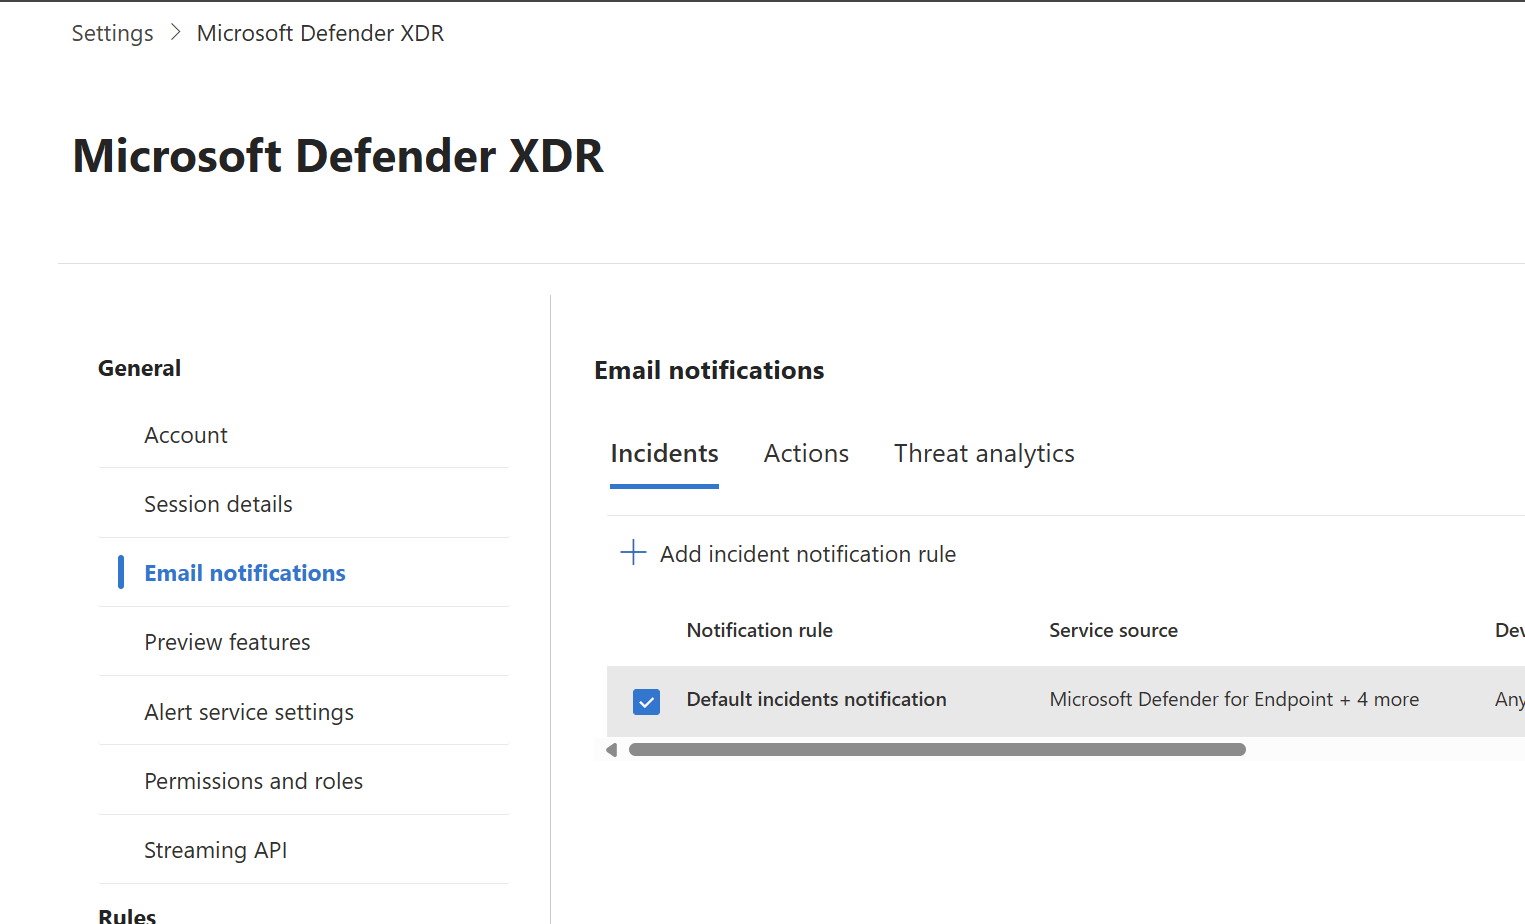
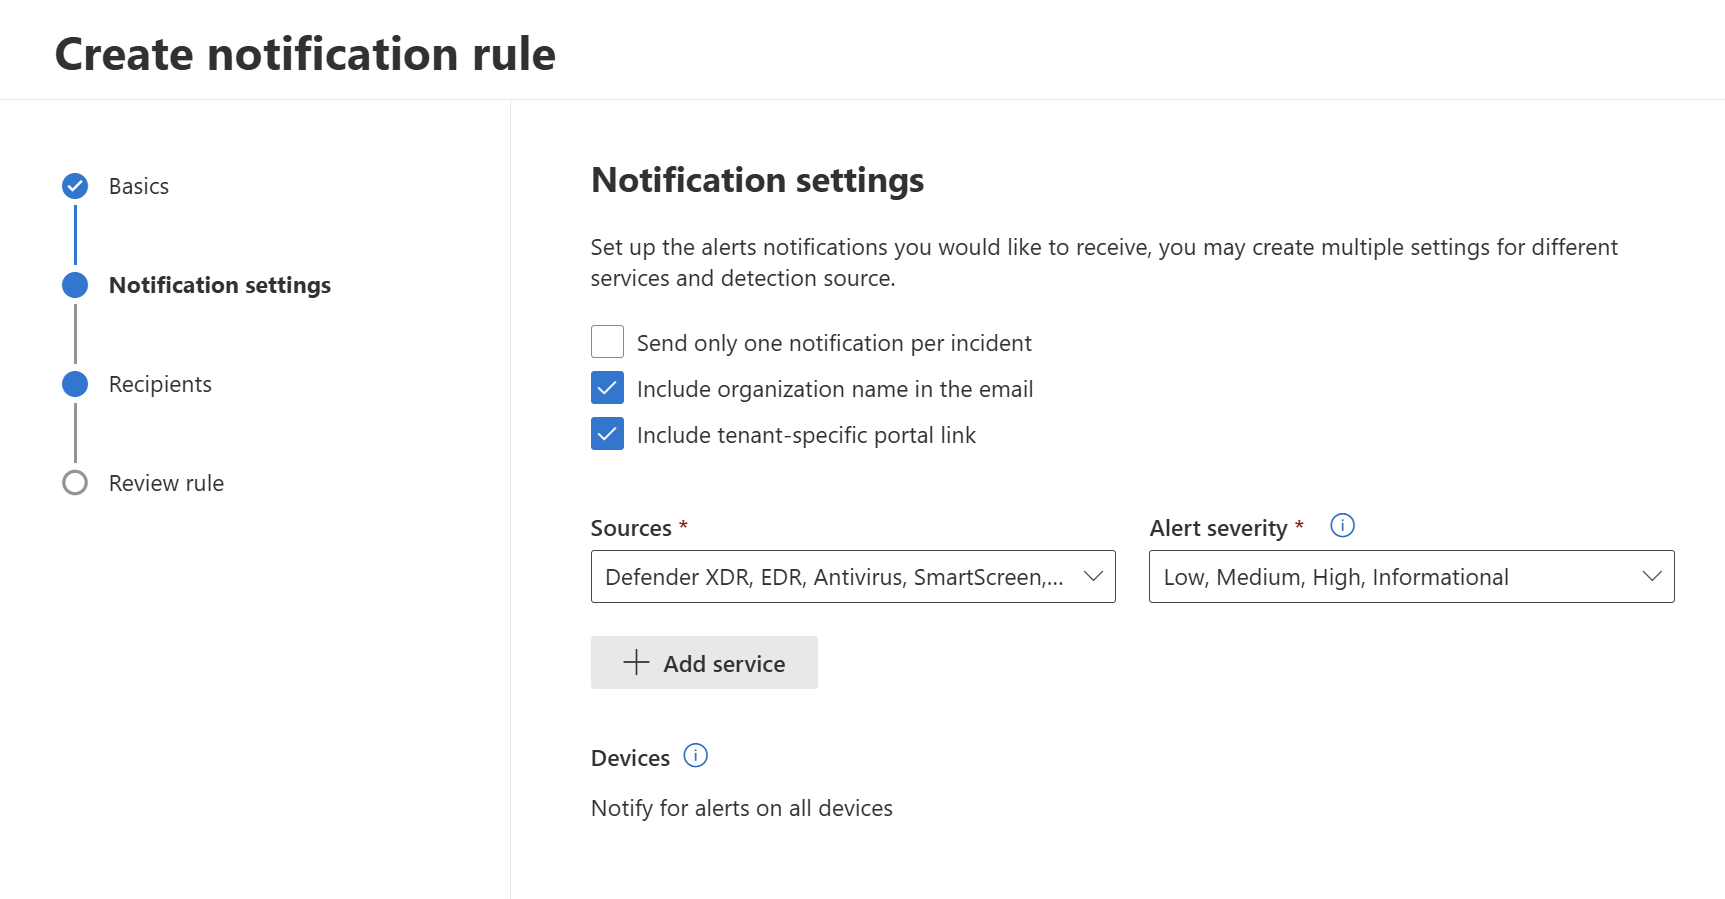
Update your notification and rules to ensure the tenant name is attached and the services for alerts are detected. The alert severity is tough given that including low and informational will generate a ton of noise but alerts like the creation of an inbox rules by default are informational. To overcome this, you can go to Email and Collaboration>Policies and Rules>Alert Policies and create your own rules that follow a higher severity
Respond
If you do not have Entra P2 licensing, the alerting/detection you are going to get for suspicious/malicious sign-ins is going to be limited. The following workflow will assume you have at least a P1 license in the tenant.
1. Are there unfamiliar sign-in properties?
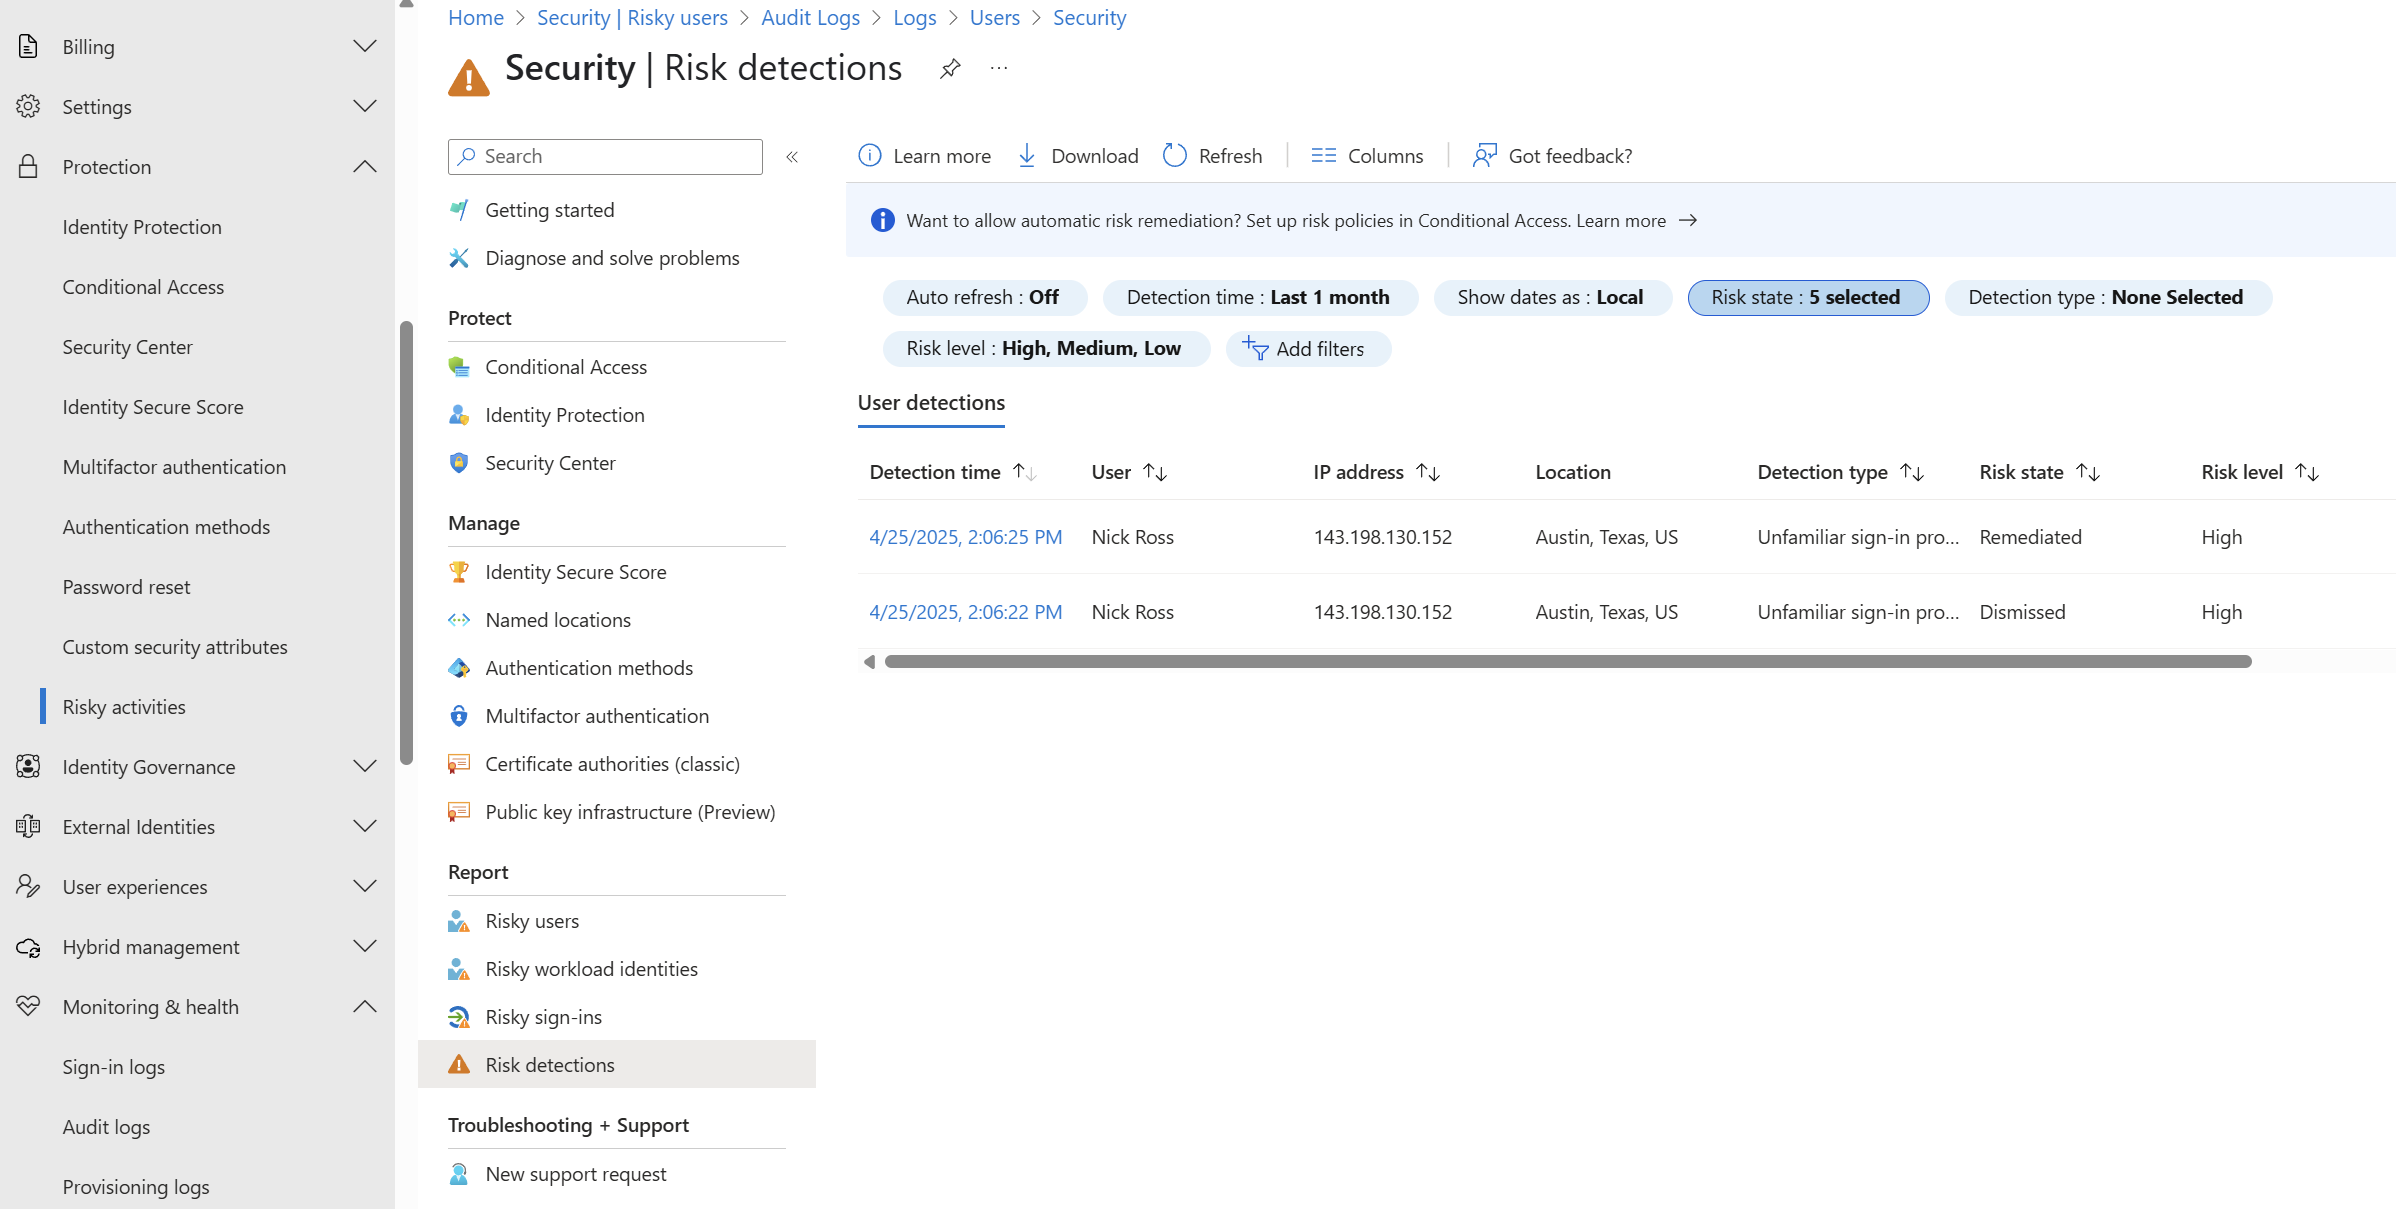
Check the Risk Detections Report in Entra. (Entra Admin Center>Protections>Risky Activities>Risk Detections). This comes with P1. Look for any detections that seem suspicious. The initial token theft event will be a successful sign in on the end-user device but in most cases from an abnormal location/IP.
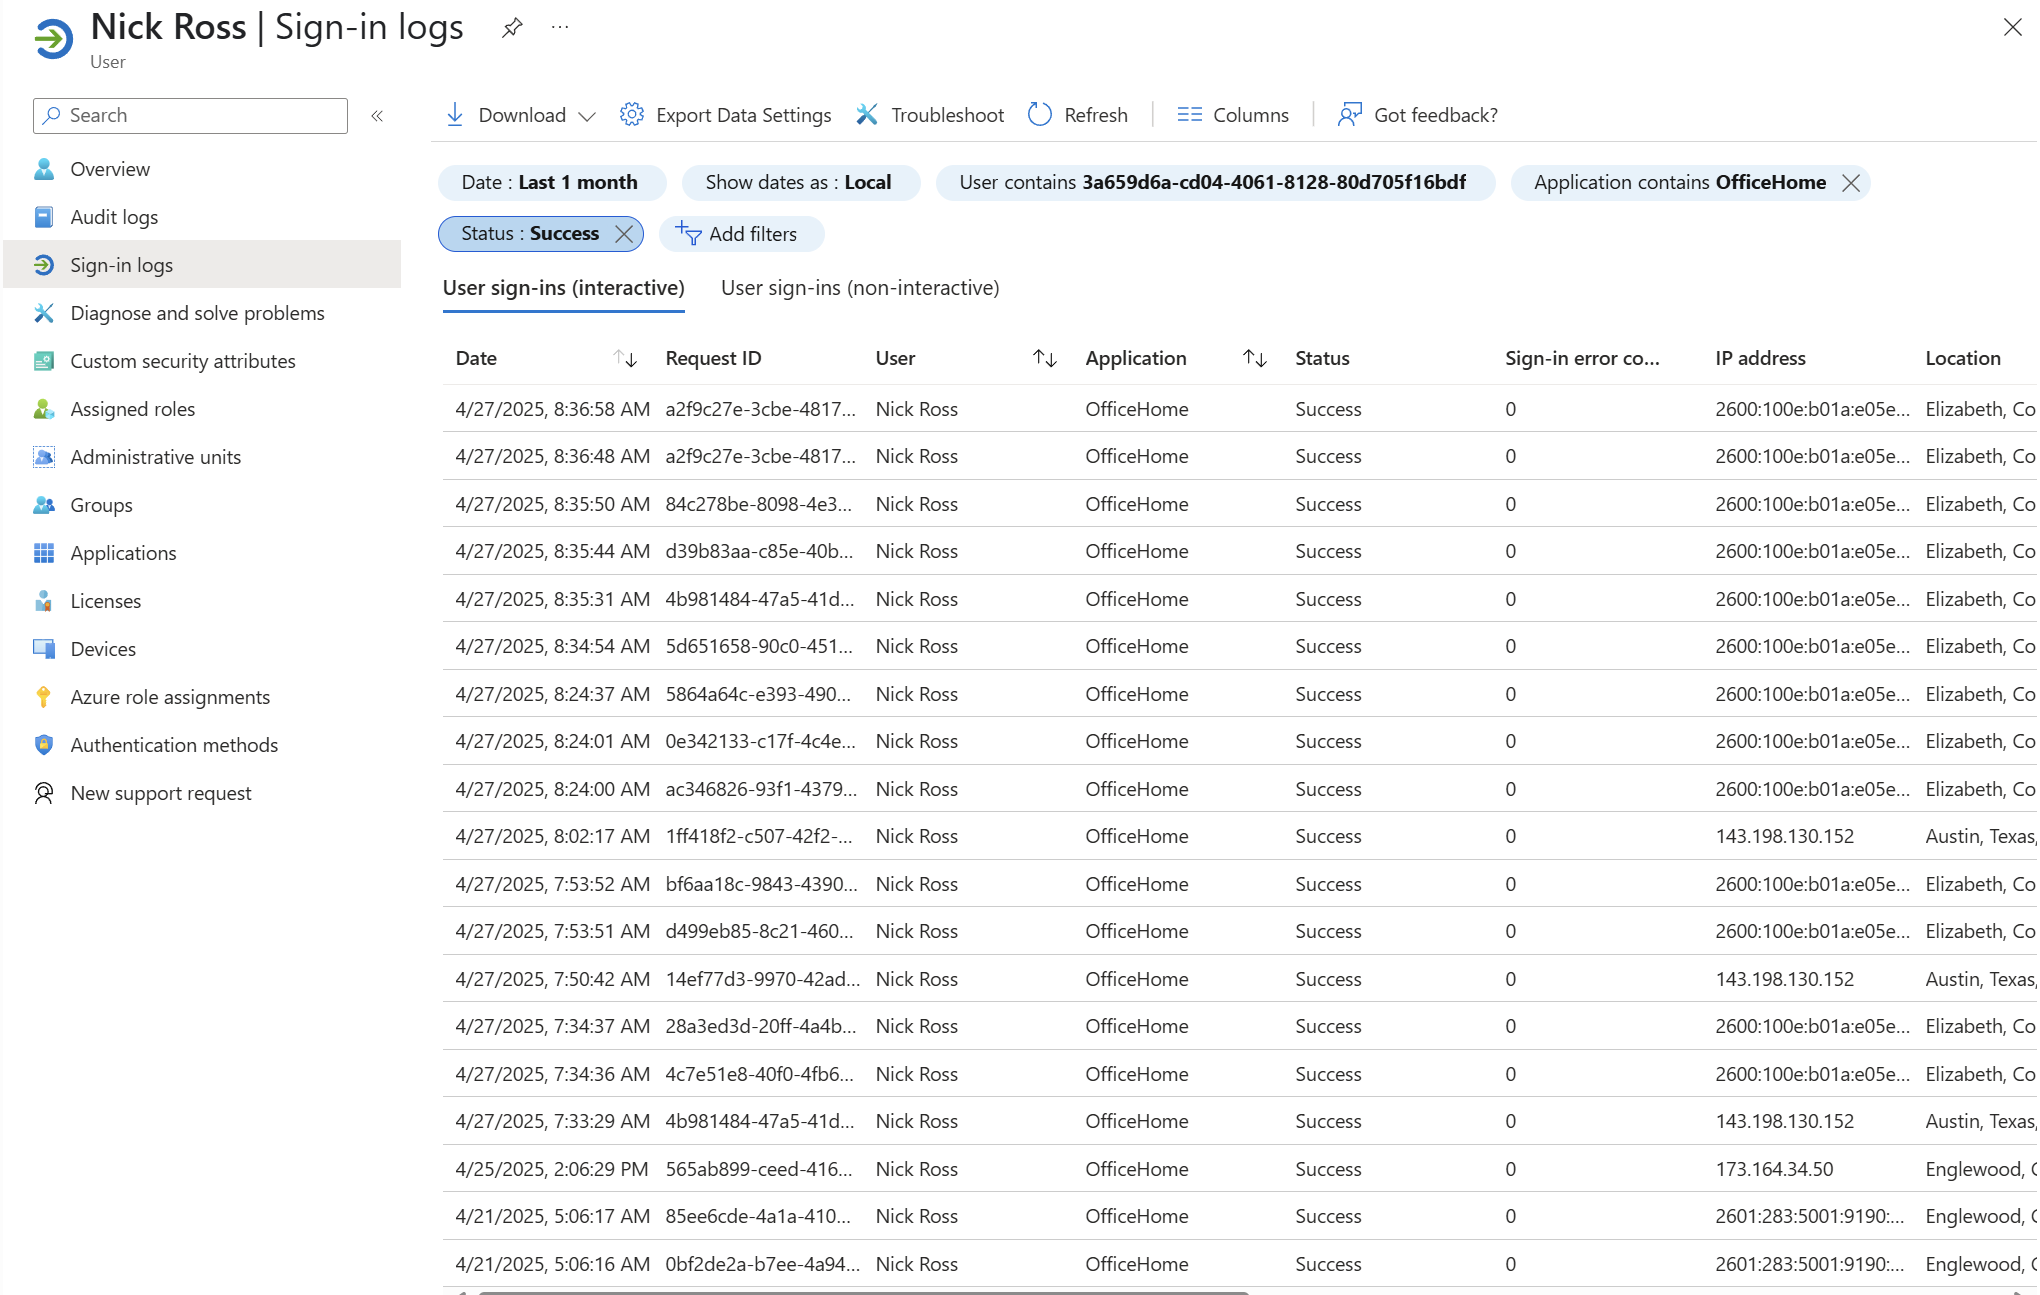
Check the recent sign-in logs for the user (Entra ID Admin Center>Users>Select User>Sign-In Logs). Pro Tip: Use the filters of Status = Succeess and Application = OfficeHome. OfficeHome is the office login page typically used in AiTM attacks leveraging tools like Evilginx for the initial token theft event. Spot the anomaly?
Lastly, in the Defender Admin Center, you can use the Advanced Hunting section to perform faster queries than the traditional sign-in log approach. I built the following query to quickly aggregate all sign ins by location for a user:
AADSignInEventsBeta
| where ErrorCode == "0" // Successful sign-in
| where AccountUpn == "nross@cloudcapsule.io"
| where ApplicationId == "4765445b-32c6-49b0-83e6-1d93765276ca"
| where isnotempty(City) and isnotempty(State) and isnotempty(IPAddress) // Filter out empty locations
| summarize Count = count(), DistinctCities = dcount(City), DistinctStates = dcount(State), DistinctIP = dcount(IPAddress) by AccountUpn, City, State, IPAddress
| where Count > 1 // Lowered this to 1 for testing
| project AccountUpn, Count, DistinctCities, DistinctStates, DistinctIP, City, State, IPAddress
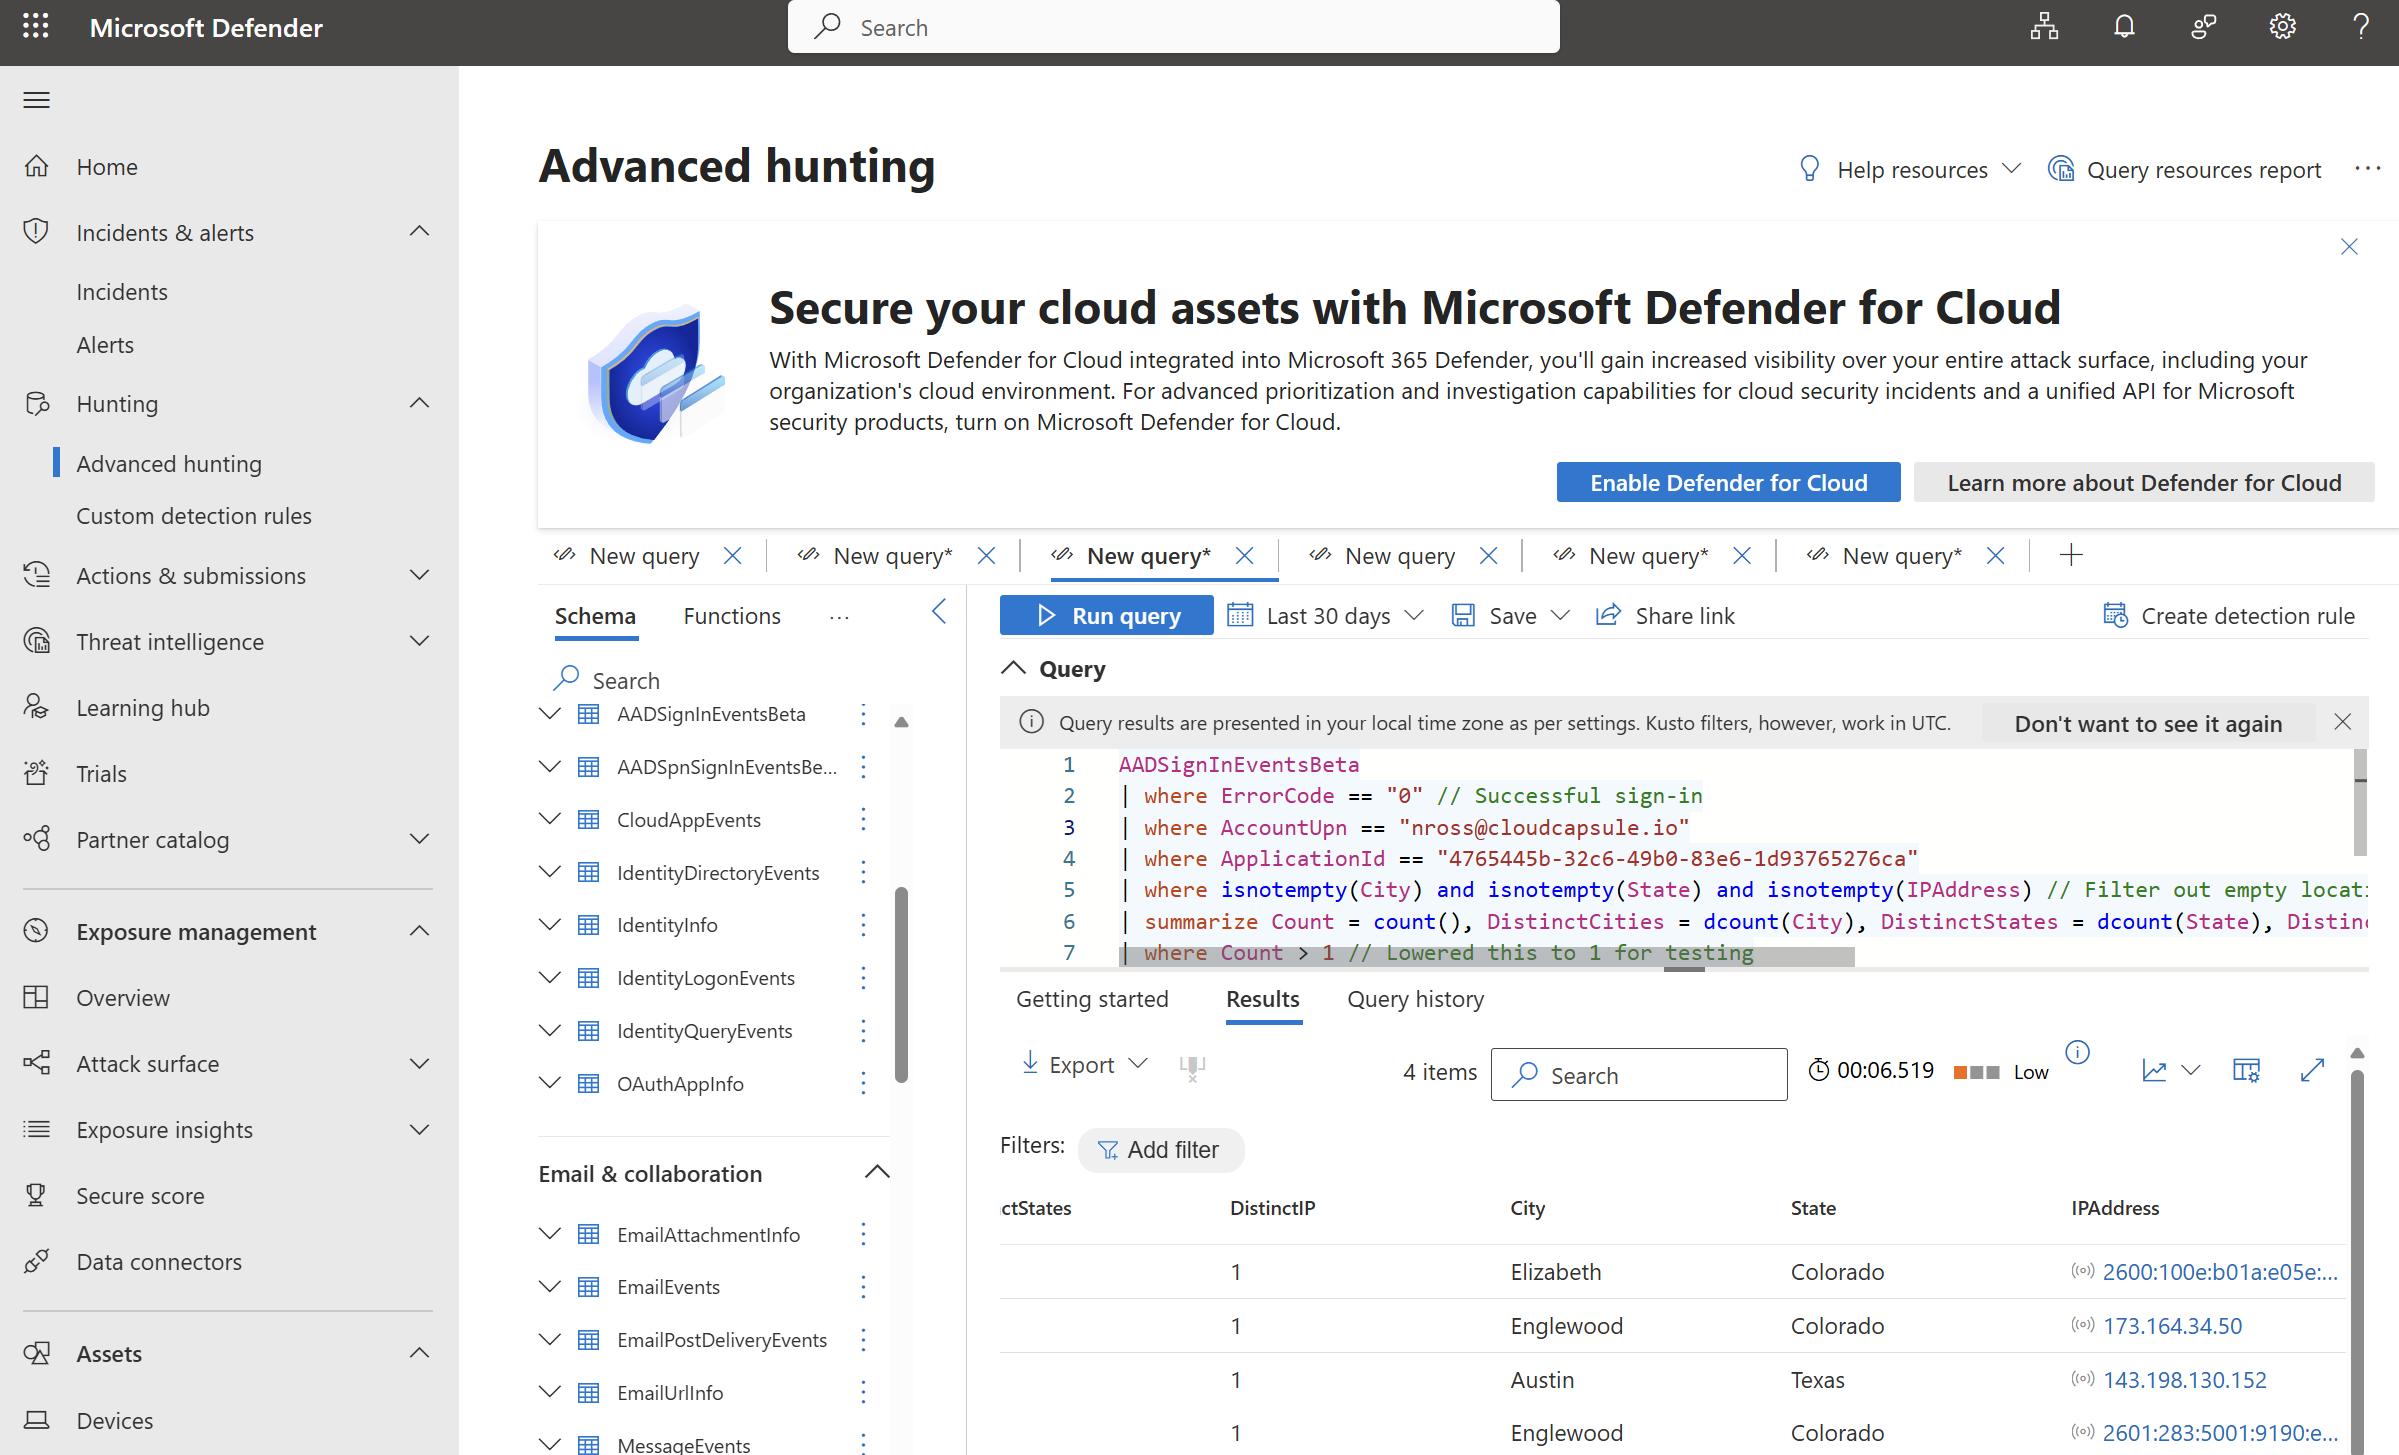
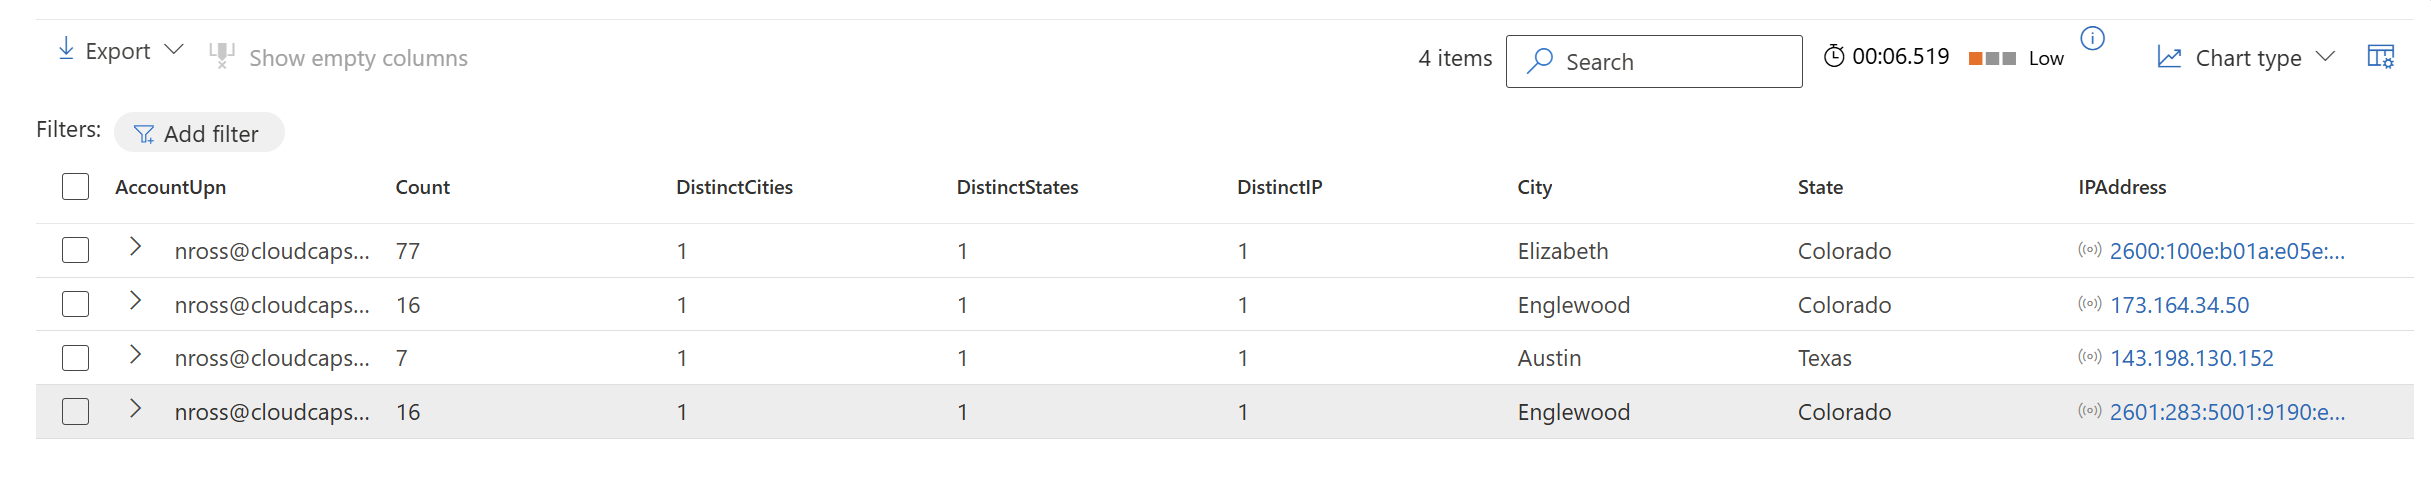
Result:
2. Confirm User Compromise
These findings might be enough to confirm the user has been compromise if you see things like impossible travel, sign in from outside the country, etc. An attacker can spin up an environment or obfuscate their locations so the location could easily be coming within the country like you are seeing here where I stood up an evilginx server with an IP in Austin.
Steps to Perform here:
- Reach out to the user to confirm legitimate sign-in (if necessary)
- If the sign-in is legitimate and/or no indicators signal compromise, move on to the next step
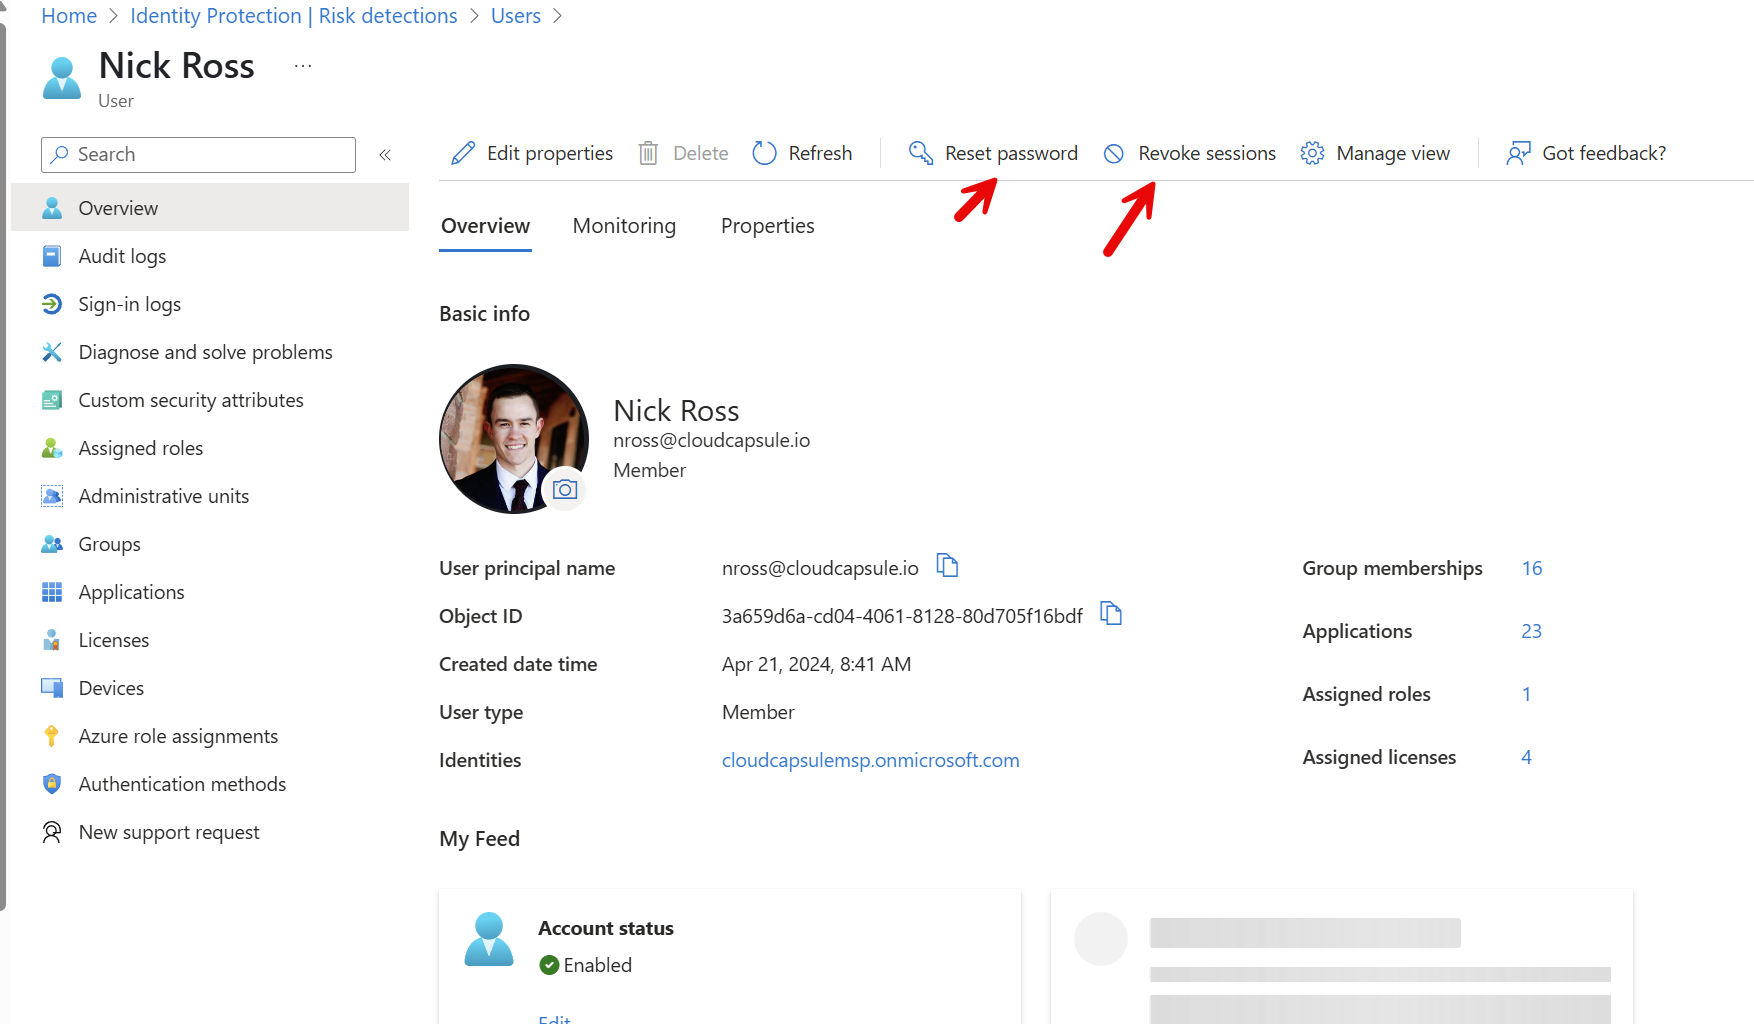
- Reset the user password, Revoke all sessions, and block user-sign in until the breach is contained and investigation complete.
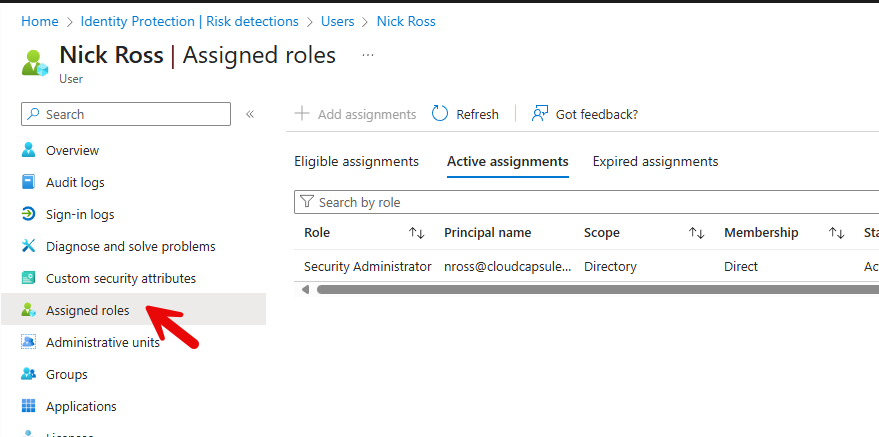
3. Understand User Permissions
To fully understand scope, you could check the permissions for the user to know if they have any admin rights. It is also helpful to understand their title/role within the org to understand if they are a “sensitive” user (i.e. they have rights to wire funds, they are the CEO, etc.). If they do have admin rights, the risk here is much higher and more steps will need to be taken which I will talk about later.
4. Understand if any other users signing in from IP
Its possible the attacker sent the same phishing email to multiple users in the organization. It’s helpful to understand if multiple users were seen signing in from the same IP.
In the Entra Admin Center> Monitoring & Health>Sign-In Logs and use the filters for both interactive and non-interactive sign ins for the IP

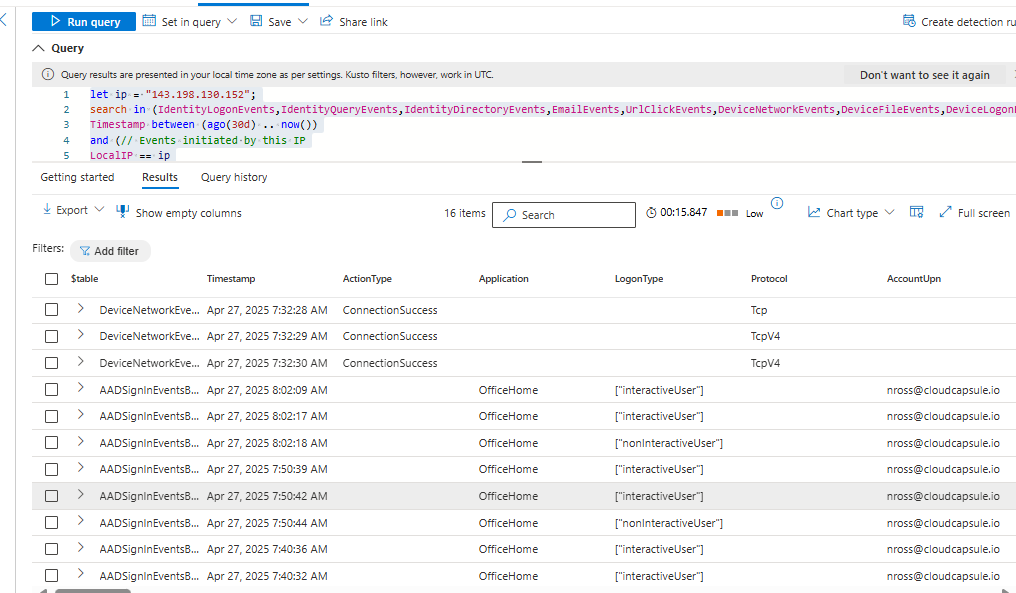
In the Defender Admin Center, you can use the advanced hunting again to search for the IP as well where the IP is the IP you want to search for:
let ip = "143.198.130.152";
search in (IdentityLogonEvents,IdentityQueryEvents,IdentityDirectoryEvents,EmailEvents,UrlClickEvents,DeviceNetworkEvents,DeviceFileEvents,DeviceLogonEvents,DeviceEvents,BehaviorEntities,CloudAppEvents,AADSpnSignInEventsBeta,AADSignInEventsBeta)
Timestamp between (ago(30d) .. now())
and (// Events initiated by this IP
LocalIP == ip
or FileOriginIP == ip
or RequestSourceIP == ip
or SenderIPv4 == ip
or SenderIPv6 == ip
or IPAddress == ip
// Events affecting this IP
or RemoteIP == ip
or DestinationIPAddress == ip
)
| take 100
5. Investigate Email
Next, we want to try and identify what phishing email came through and expand to see if it was sent to other users in the organization. In some cases, Defender for Office 365 might have already picked this up. For this reason, its good to check in the Defender Admin Portal first.
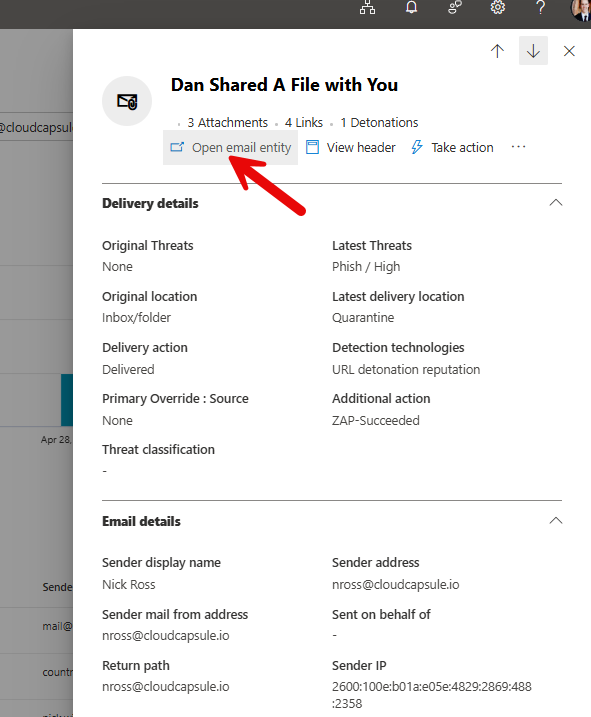
a. Look in active incidents and alerts if you haven’t gotten to this point already to see if there were any alerts generated related to this user. In the below example we can see an incident where the email was delivered to the user, the user clicked on the link, and then the email was removed via ZAP protections:
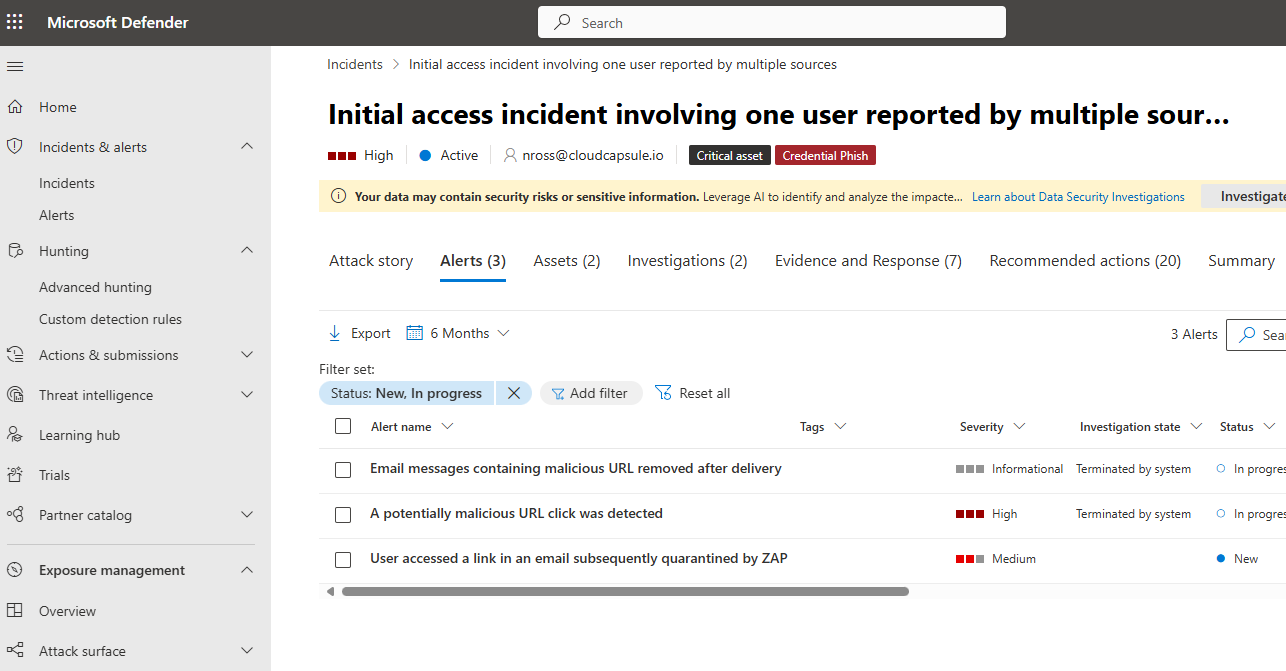
In this case, defender has aggregated all of the data for us including the malicious email and link url that was clicked on:

The incident itself should correlate and additional data such as which other users the email was sent to, who else clicked on links, etc.
If no alerts have been generated, proceed to the next step:
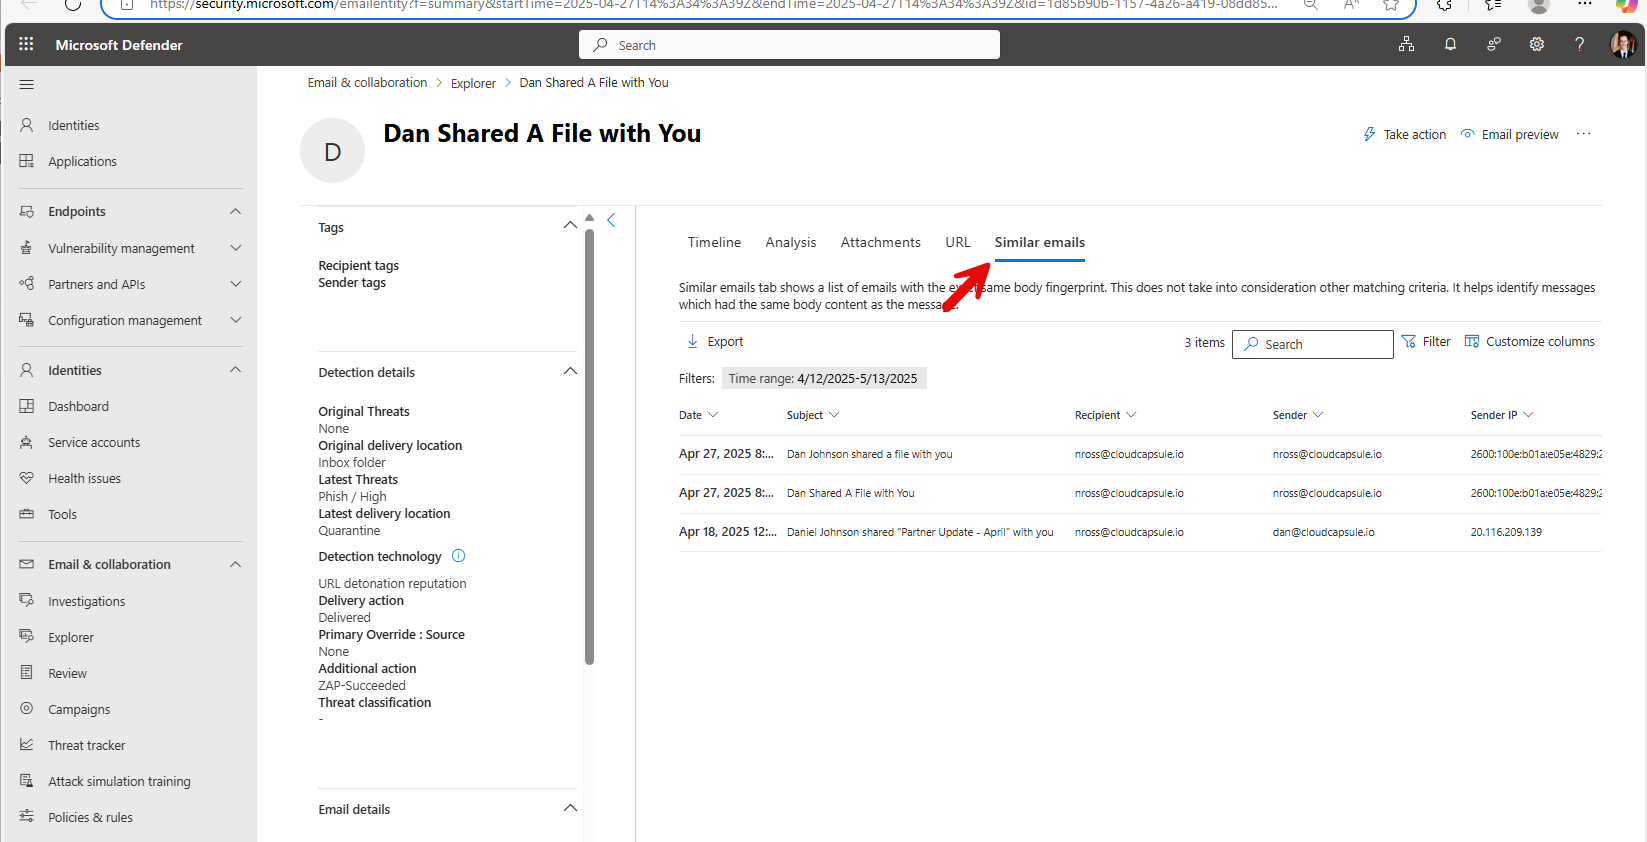
b. Check Real-Time Detections (D365 P1 licensing) or Explorer (D365 P2 Licensing) to see if there are any captured phishing emails. Here you can click on the phishing tab and filter the timeframe + recipients to be the compromised user. Here you could also filter for the original delivery location to be the Inbox and the latest to be Quarantine if you need to narrow things down. The email in this example was removed with ZAP protections:
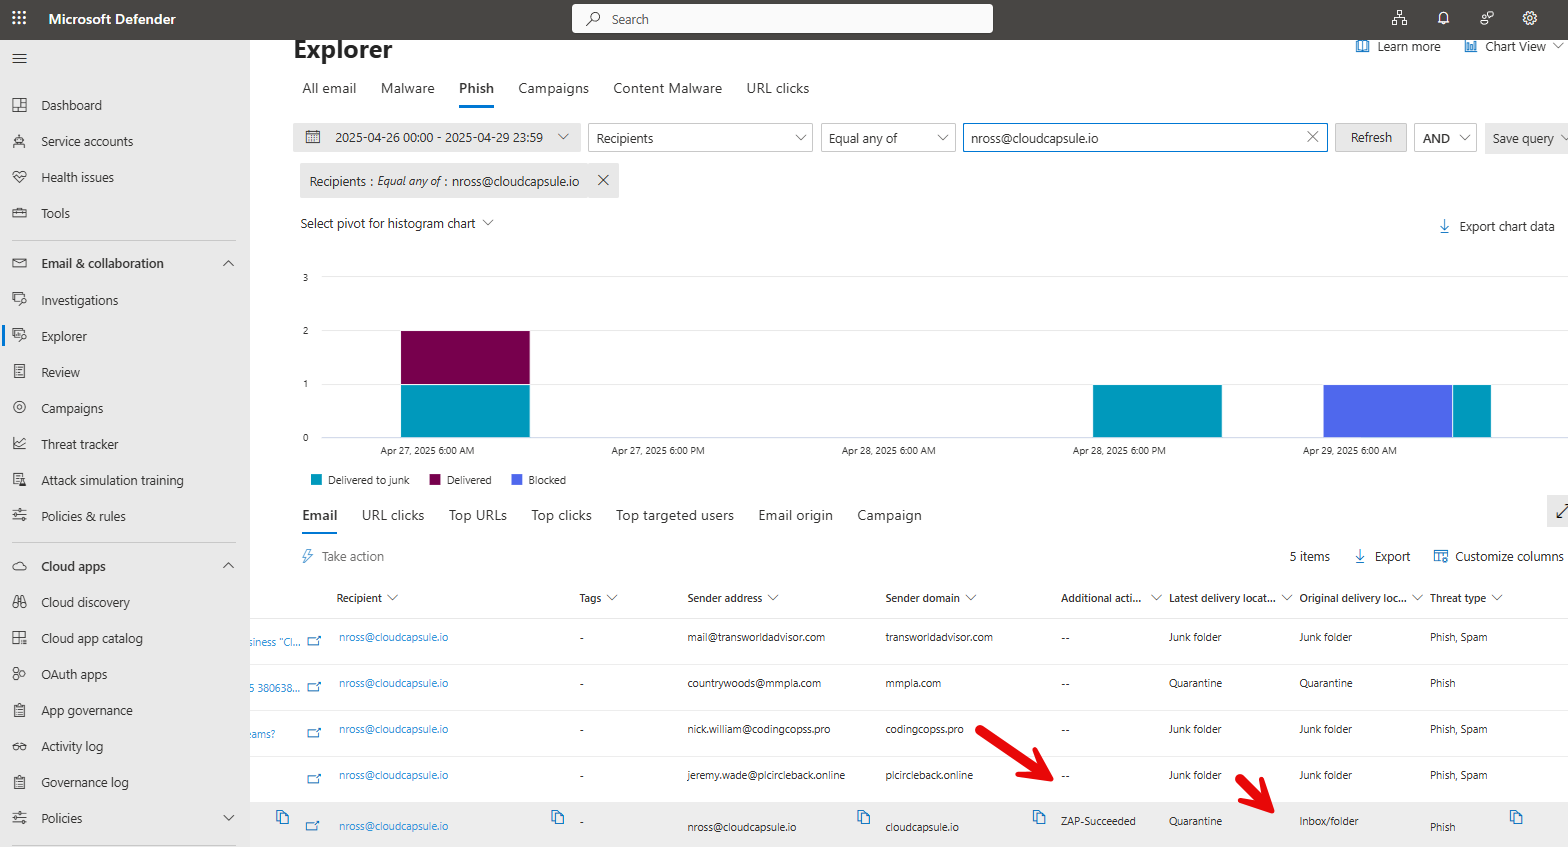
This is where you can understand more about the header information and see if there were other emails sent to others in the organization
If you are still not getting any results (i.e. Microsoft did not detect anything and the message was not flagged as phished), proceed to the next step:
c. Use Message trace to try and identify the phishing email.
Go to the Exchange Admin Center> Mail Flow > Message Trace
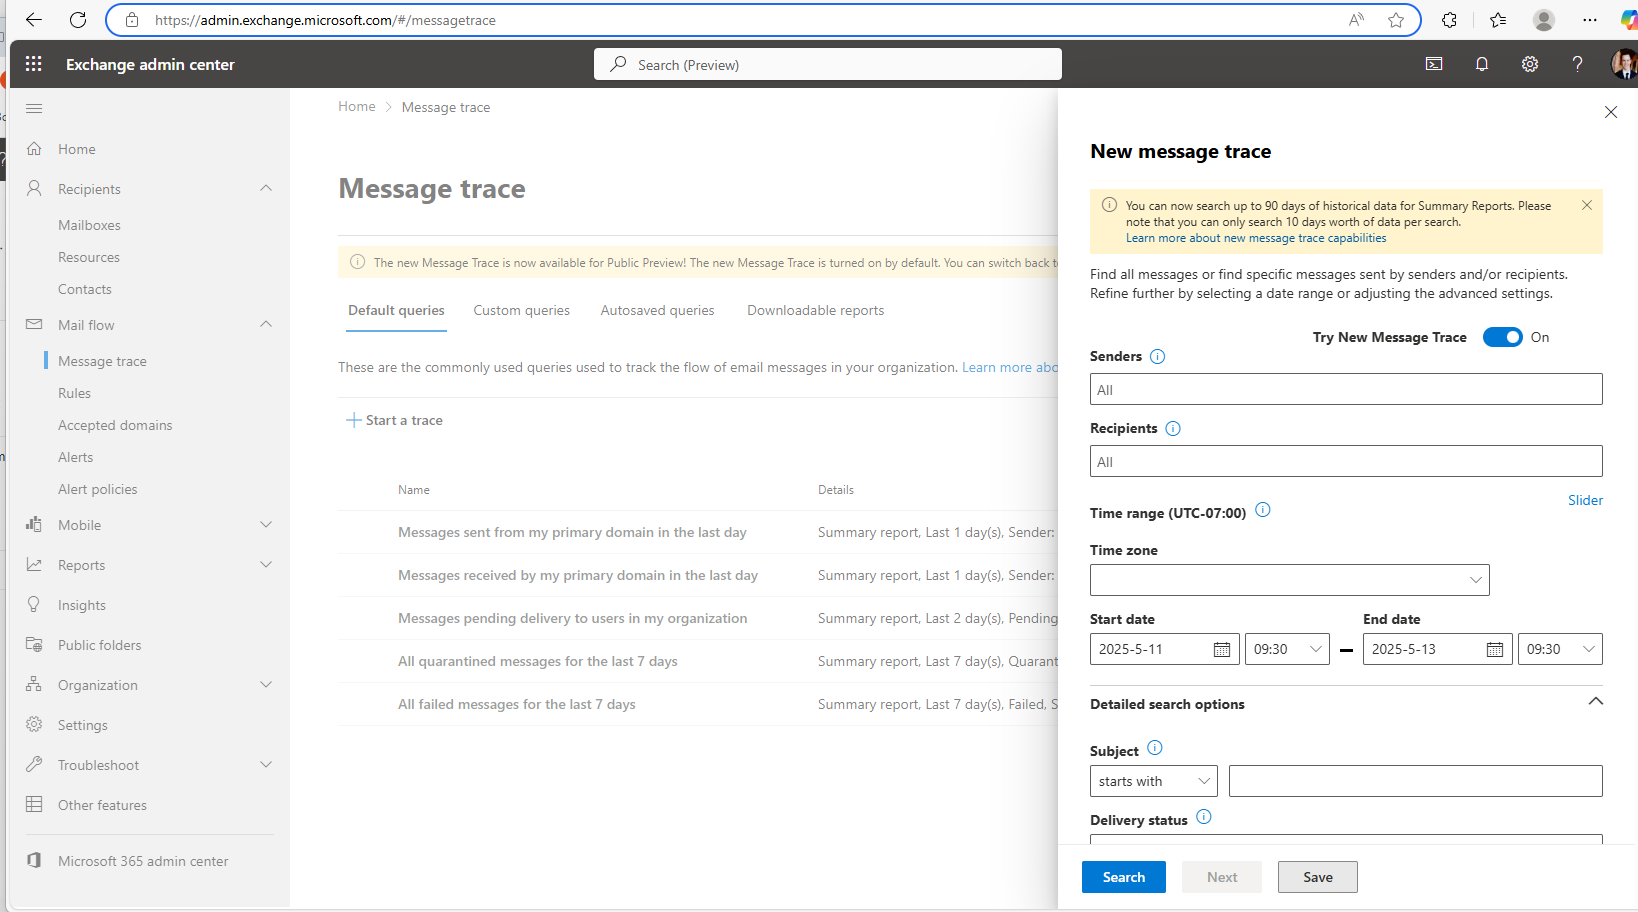
Narrow your results by filtering for a specific time range, the user as the recipient, and potentially the original IP address. Look for suspicious senders that have suspicious subject lines. Investigate messages further by clicking “View Message in Explorer”

This should show you if the same email was sent to others in the organization. You can also use message trace to find this information, searching by the subject line.
6. Remove Emails
If emails were not removed by ZAP, remove all of the emails from users mailboxes. The following can be done with Exchange PowerShell. EX:
Search-Mailbox -Identity "April Stewart" -SearchQuery 'Subject:"Your bank statement"' -DeleteContent
Post-Breach Activity
Now that we have identified scope, we want to remove any persistence set up from the attacker and ensure we remove any email messages they might have sent out as part of a broader BEC campaign.
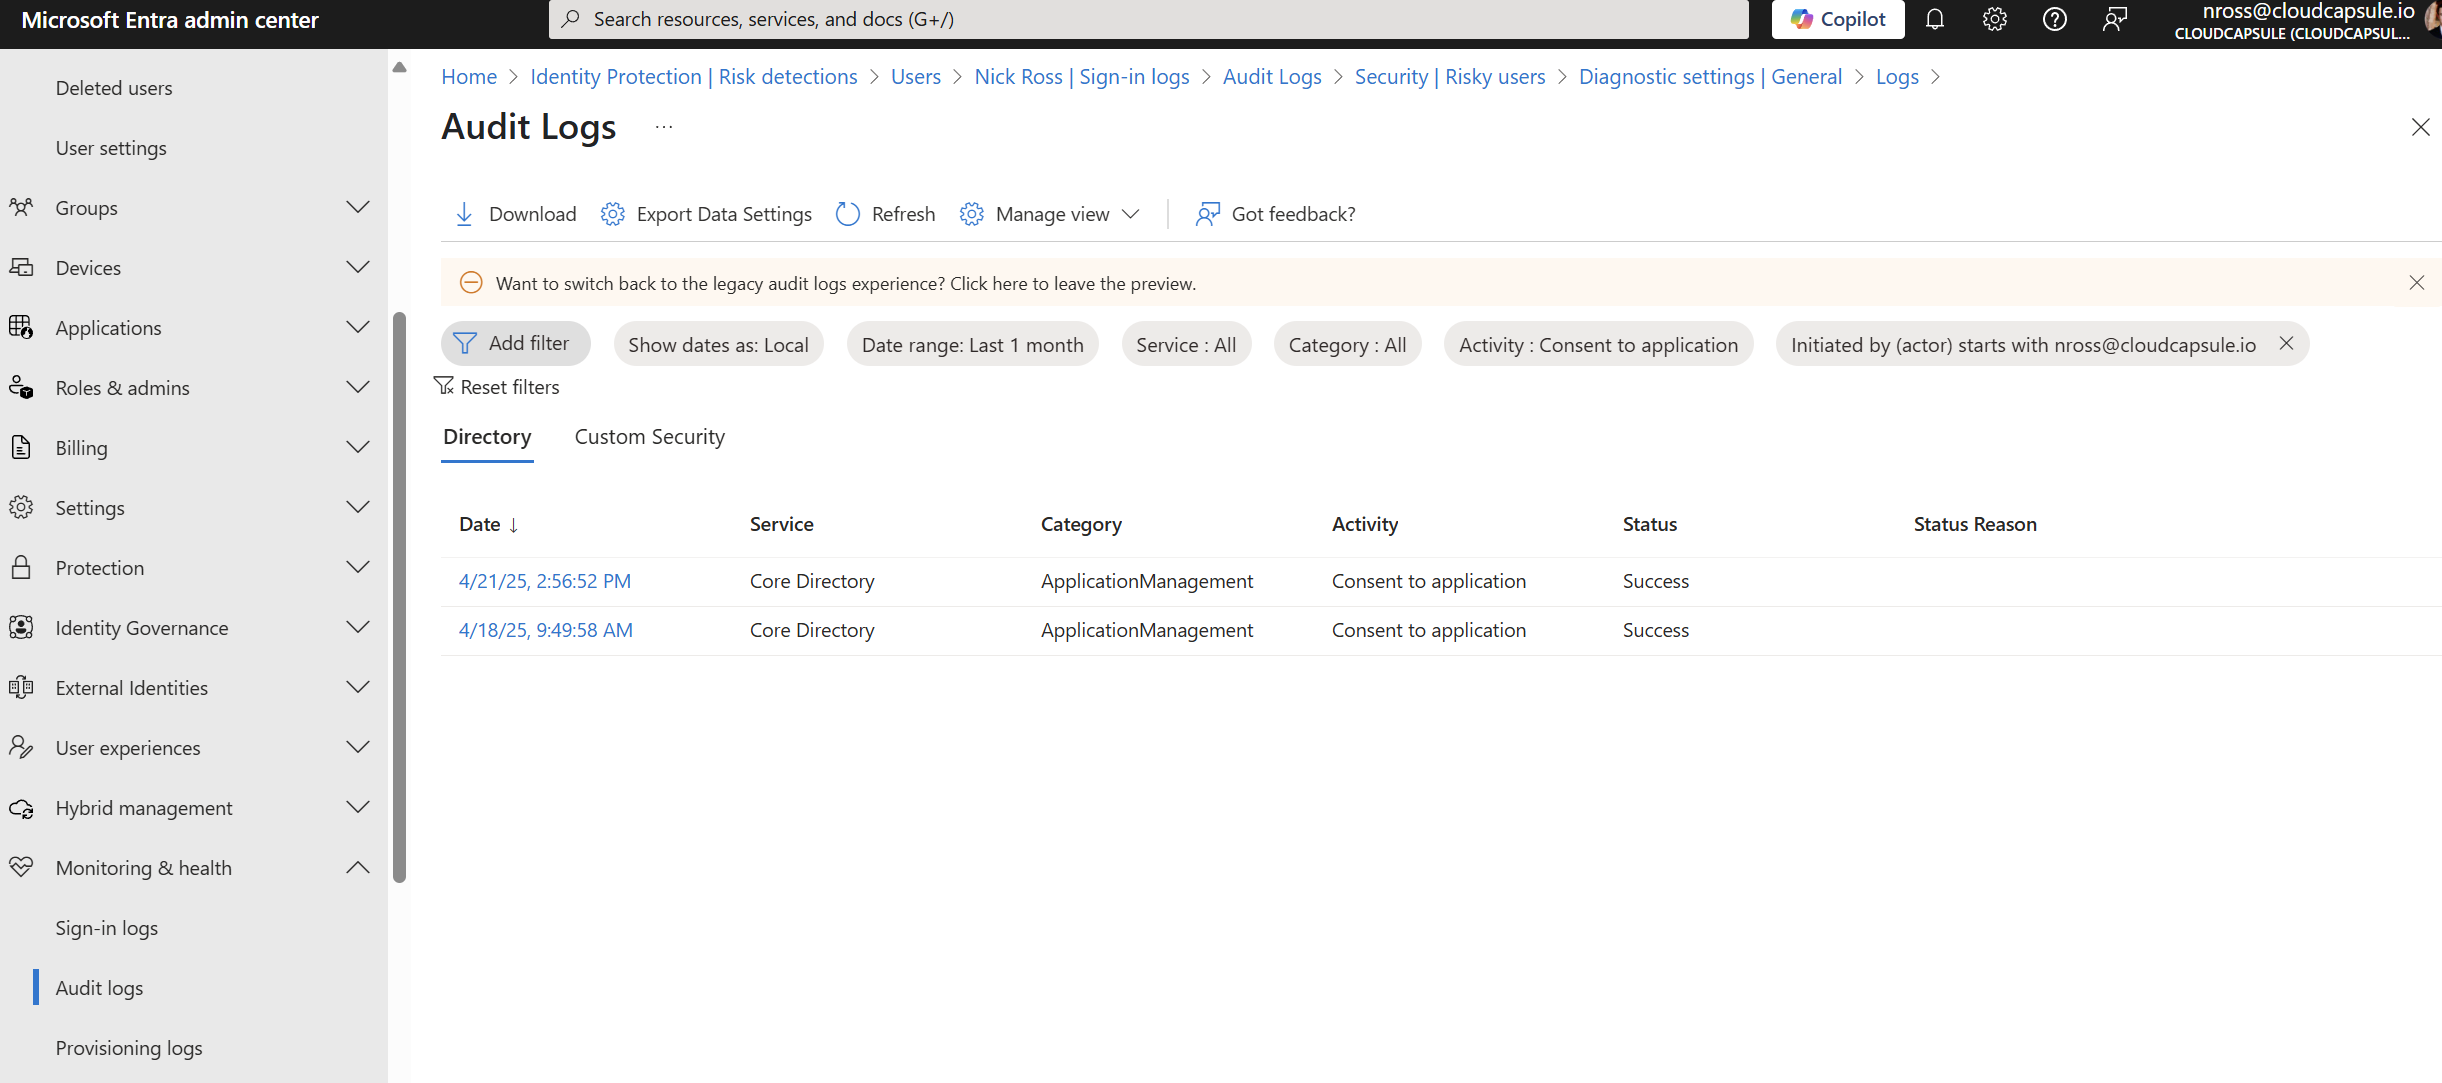
1. Audit and Remove any Registered or Consented Applications
Now that you have the relative time frame that the users account was breached, you can leverage the audit log to find any applications the user may have consented to. These applications can be leveraged as their own identify with permissions to perform certain actions like sending mail on behalf of users. We can audit this activity by “Consent to Application”
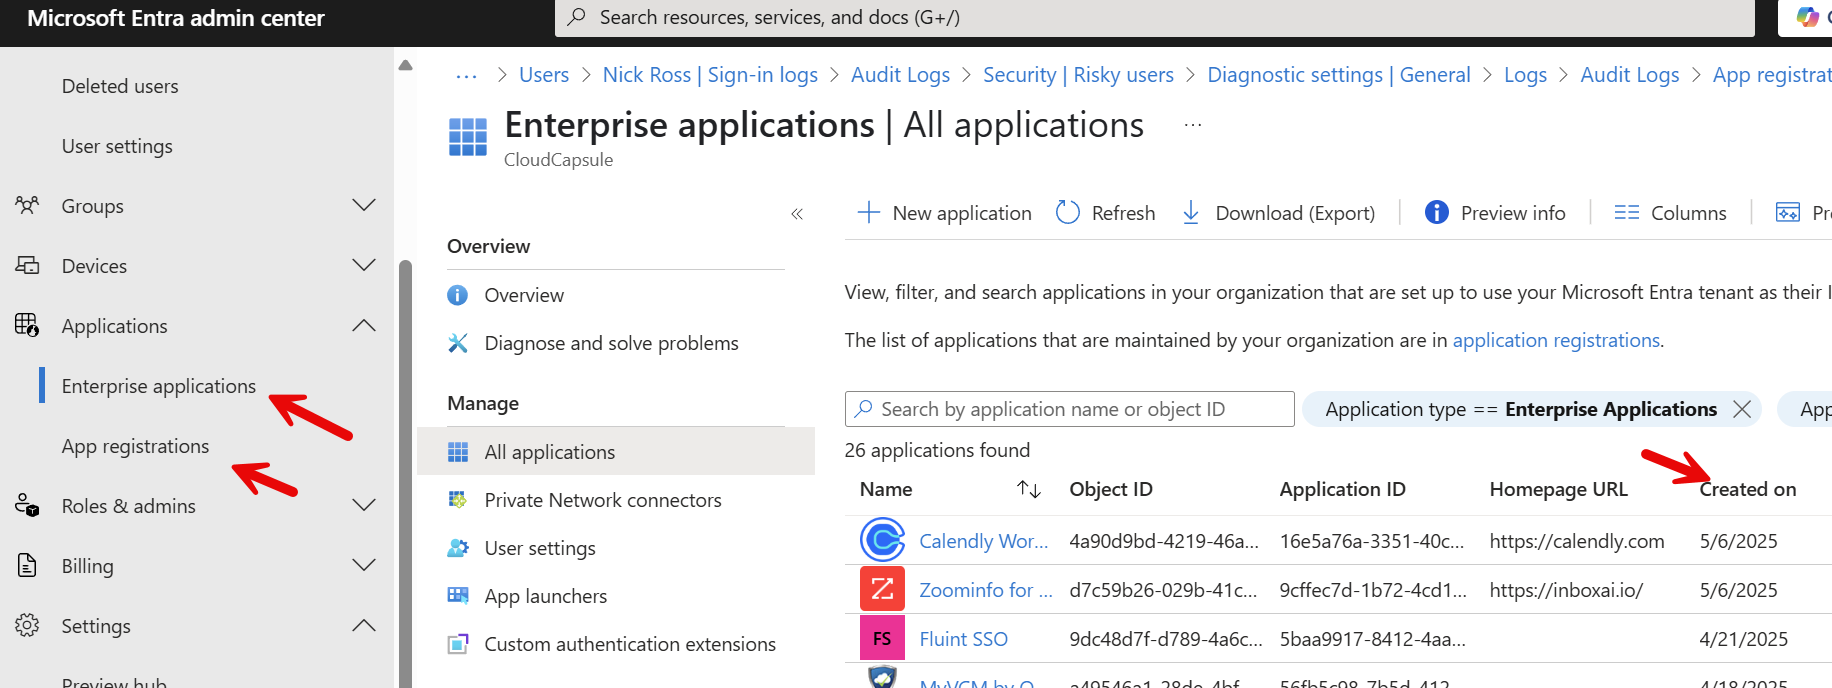
You can also go to the Enterprise apps and app registrations in Entra and sort by created date:
2. Audit and Remove any created/updated MFA methods
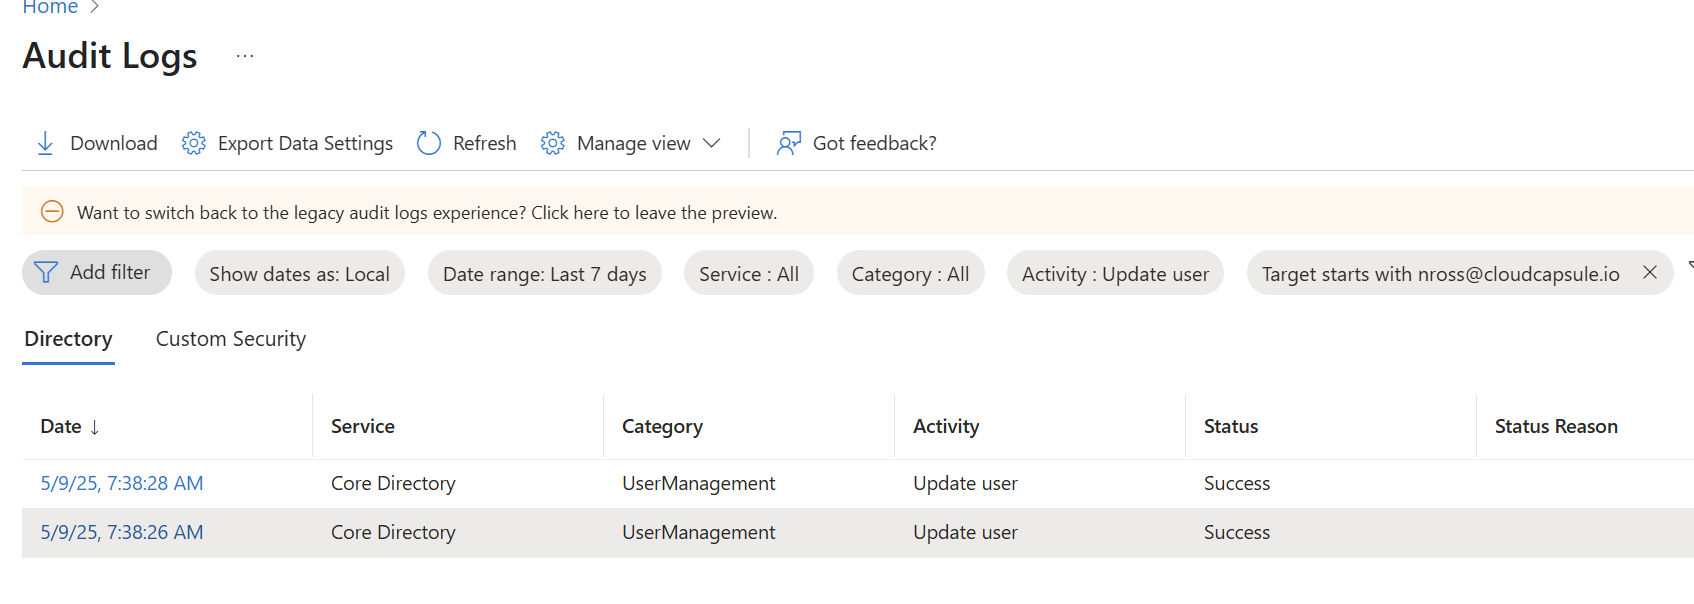
If an attacker has stolen your credentials via the AiTM attack, they have your password. They will look to register or change an MFA method to maintain persistence. We can audit this by the activity of “Update User” and Target = the user that was breached.
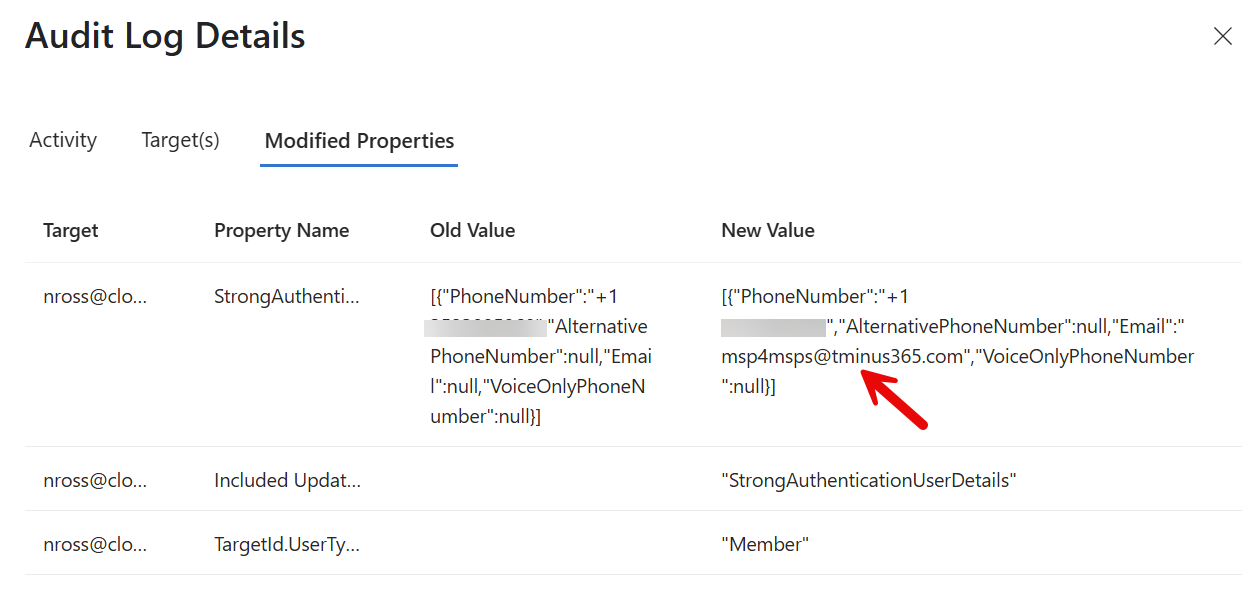
Here you will want to find a value with Modified Properties that alters the MFA. In the example below, the attacker added an email method with a 3rd party email address:
You can delete these methods by going to Users>Finding the User>Authentication Methods and deleting the non-legitimate method.

3. Audit and Remove any Registered Devices
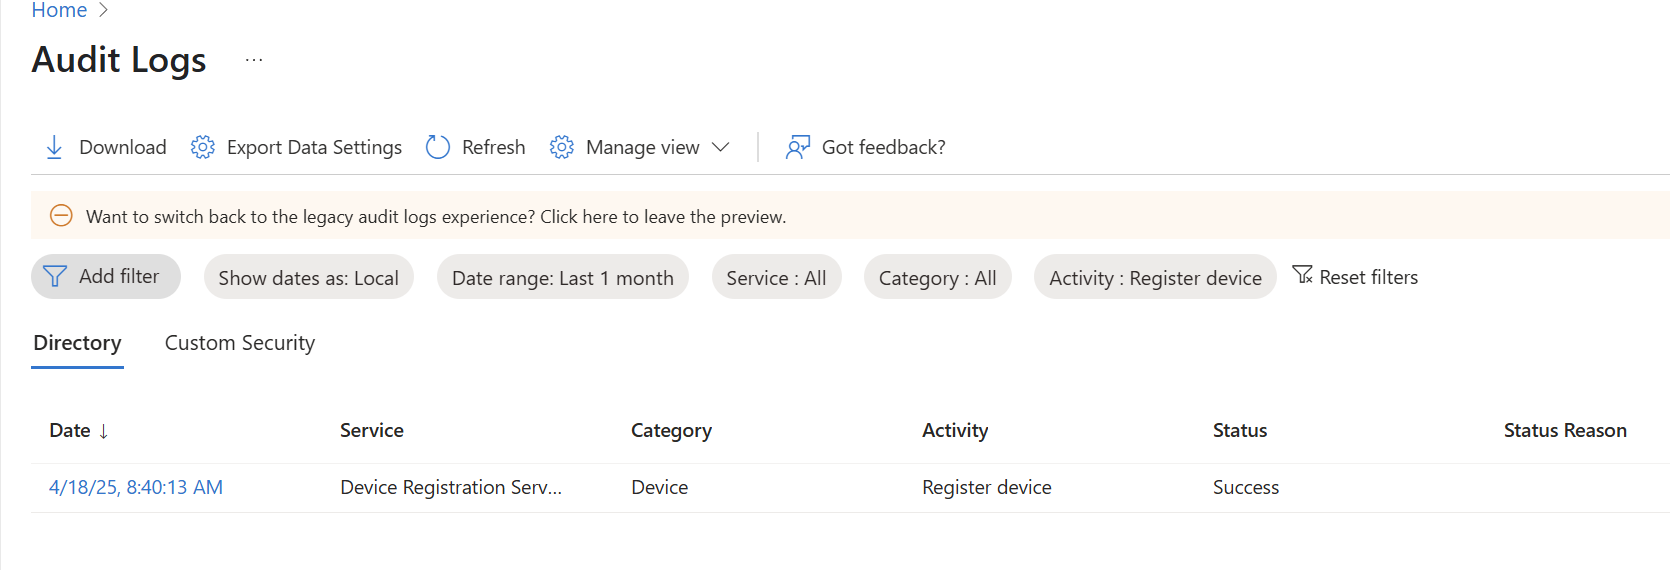
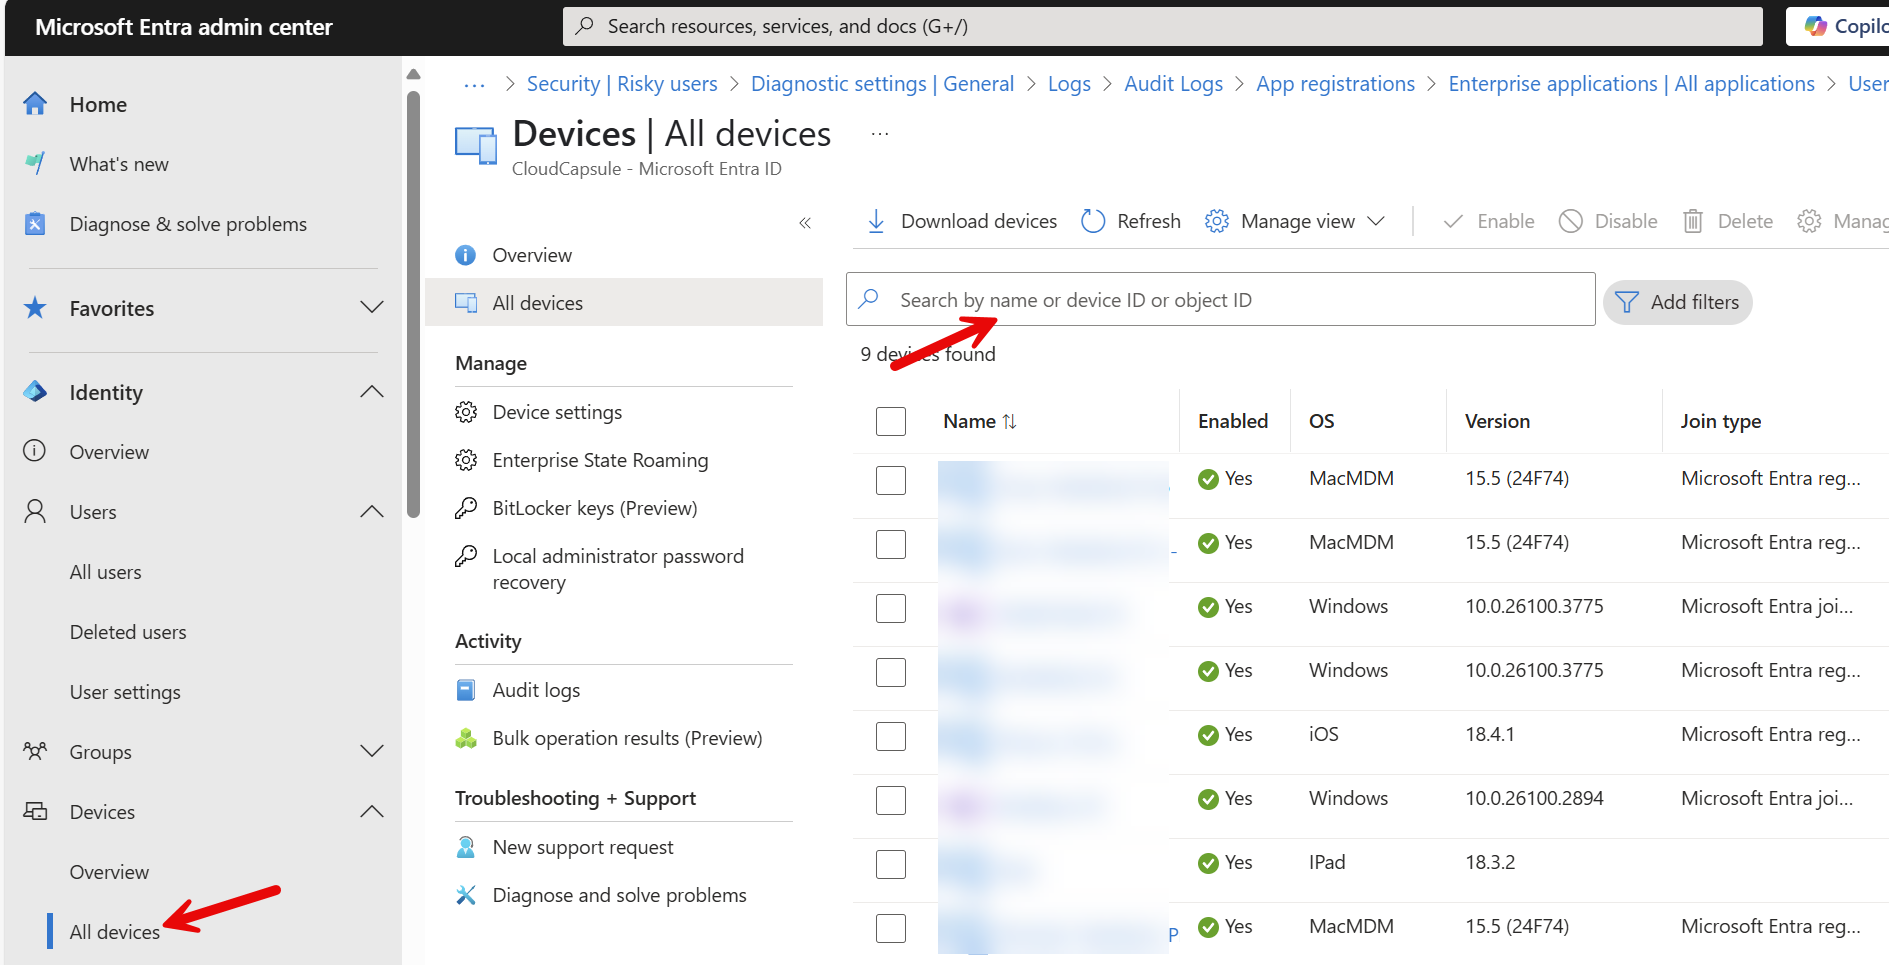
Attackers will sometimes register or join devices into Entra to be seen as a trusted device on the network. You can audit this by filtering for the acitivty of “Register Device”
If you do find an device registered that should be removed, you can grab the device ID from the audit log>Go to Devices in Entra>Delete it from Inventory

This will return all of the logs for the user you specify for the above checks. EX:

4. Identify and Remove any malicious emails sent
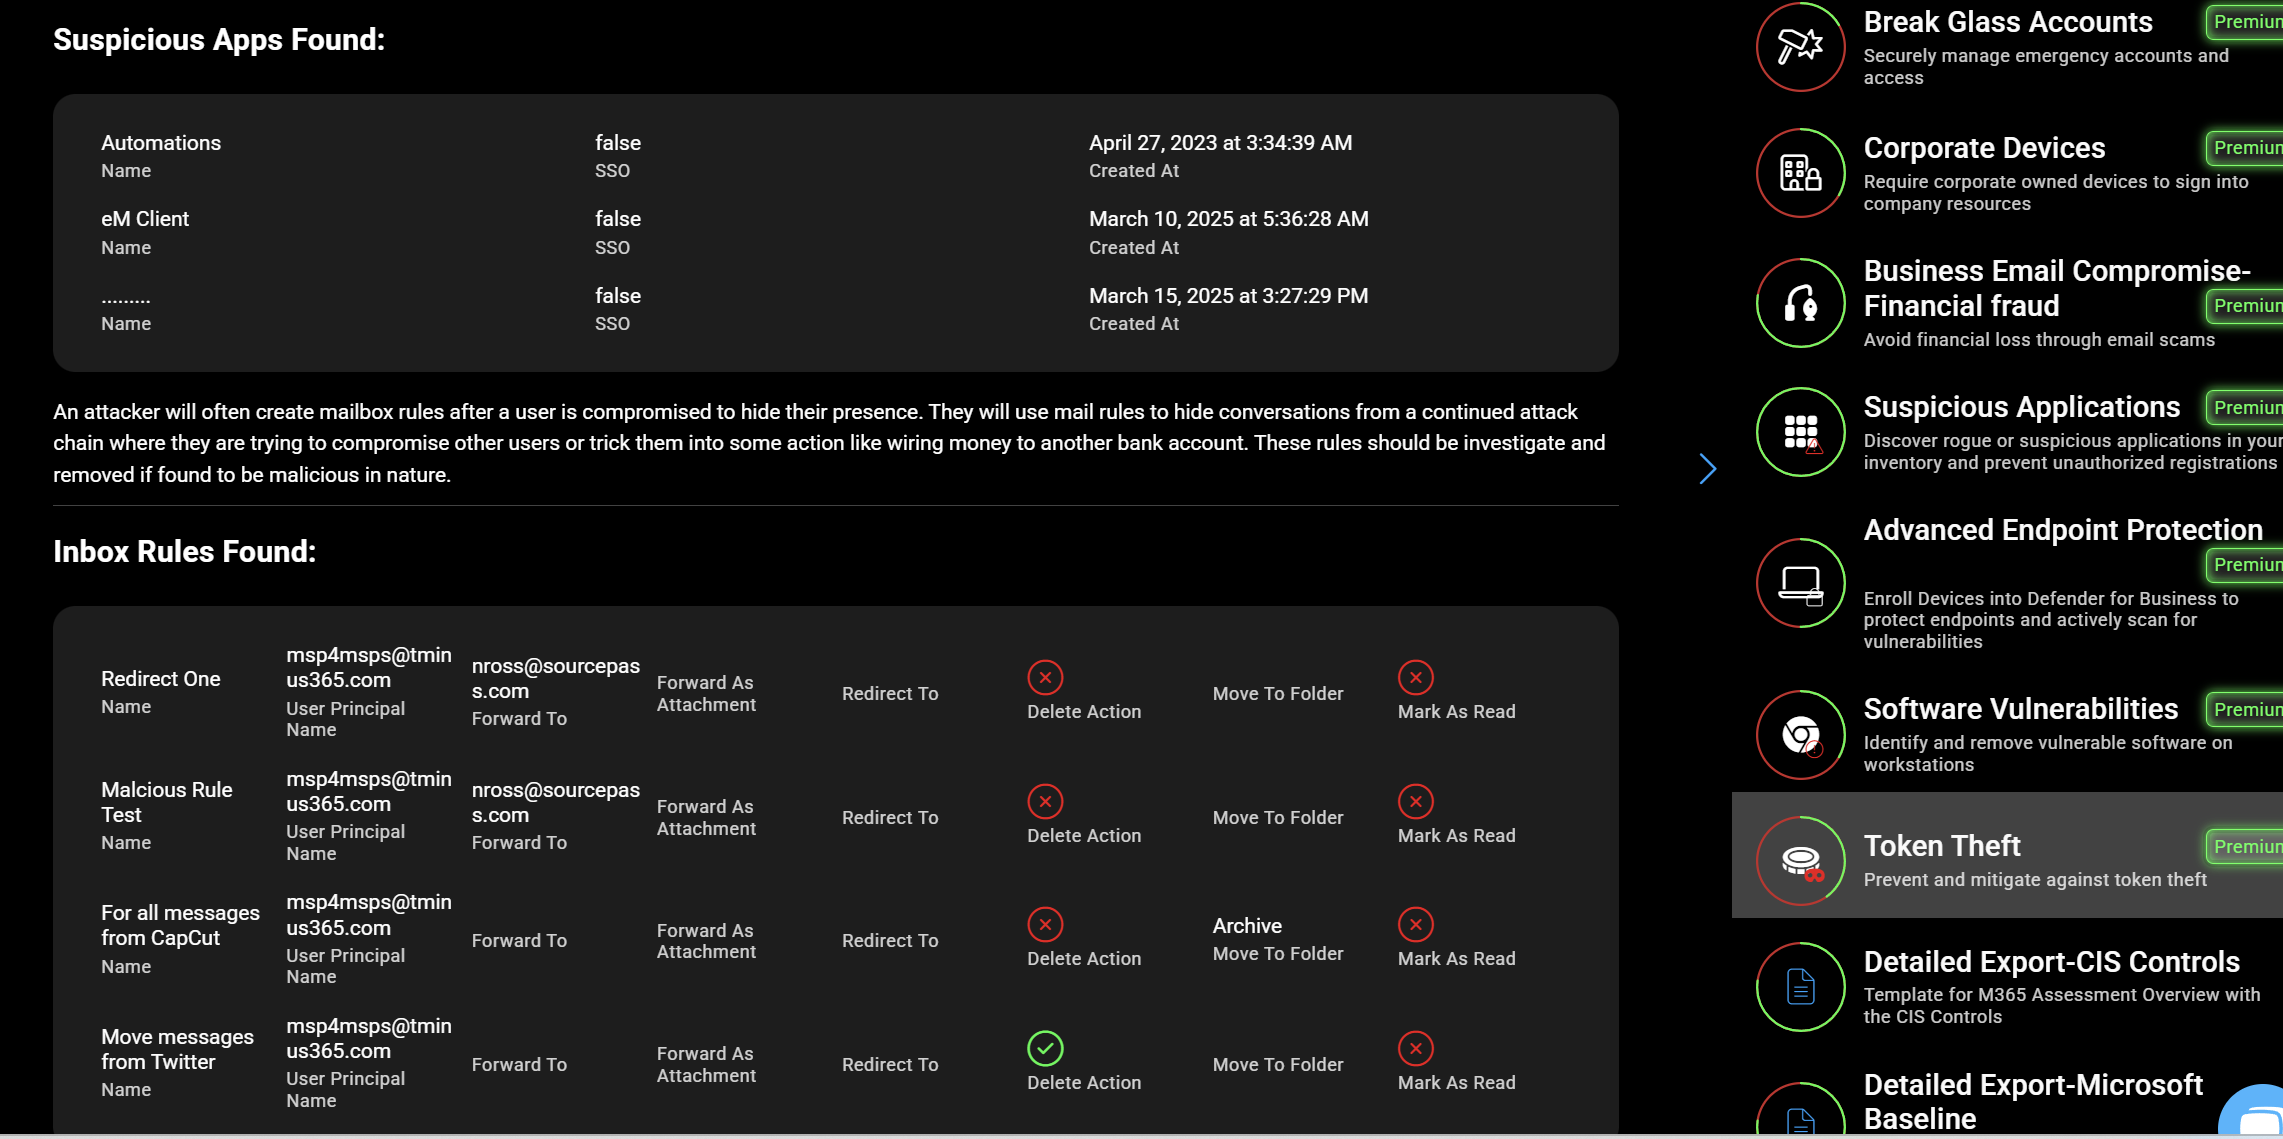
Now that we have removed potential areas of additional access, we need to ensure that the attacker did not send out any emails/campaigns as part of a broader BEC incident where they could be trying to compromise other users or trick them into action like wiring funds to fraudulent bank accounts.
Use Message Trace again in the specified time frame with that user account as the sender for filters. Identify and investigate any potentially malicious mail sent. Remove from users inbox if found to be malicious using the same steps from above.
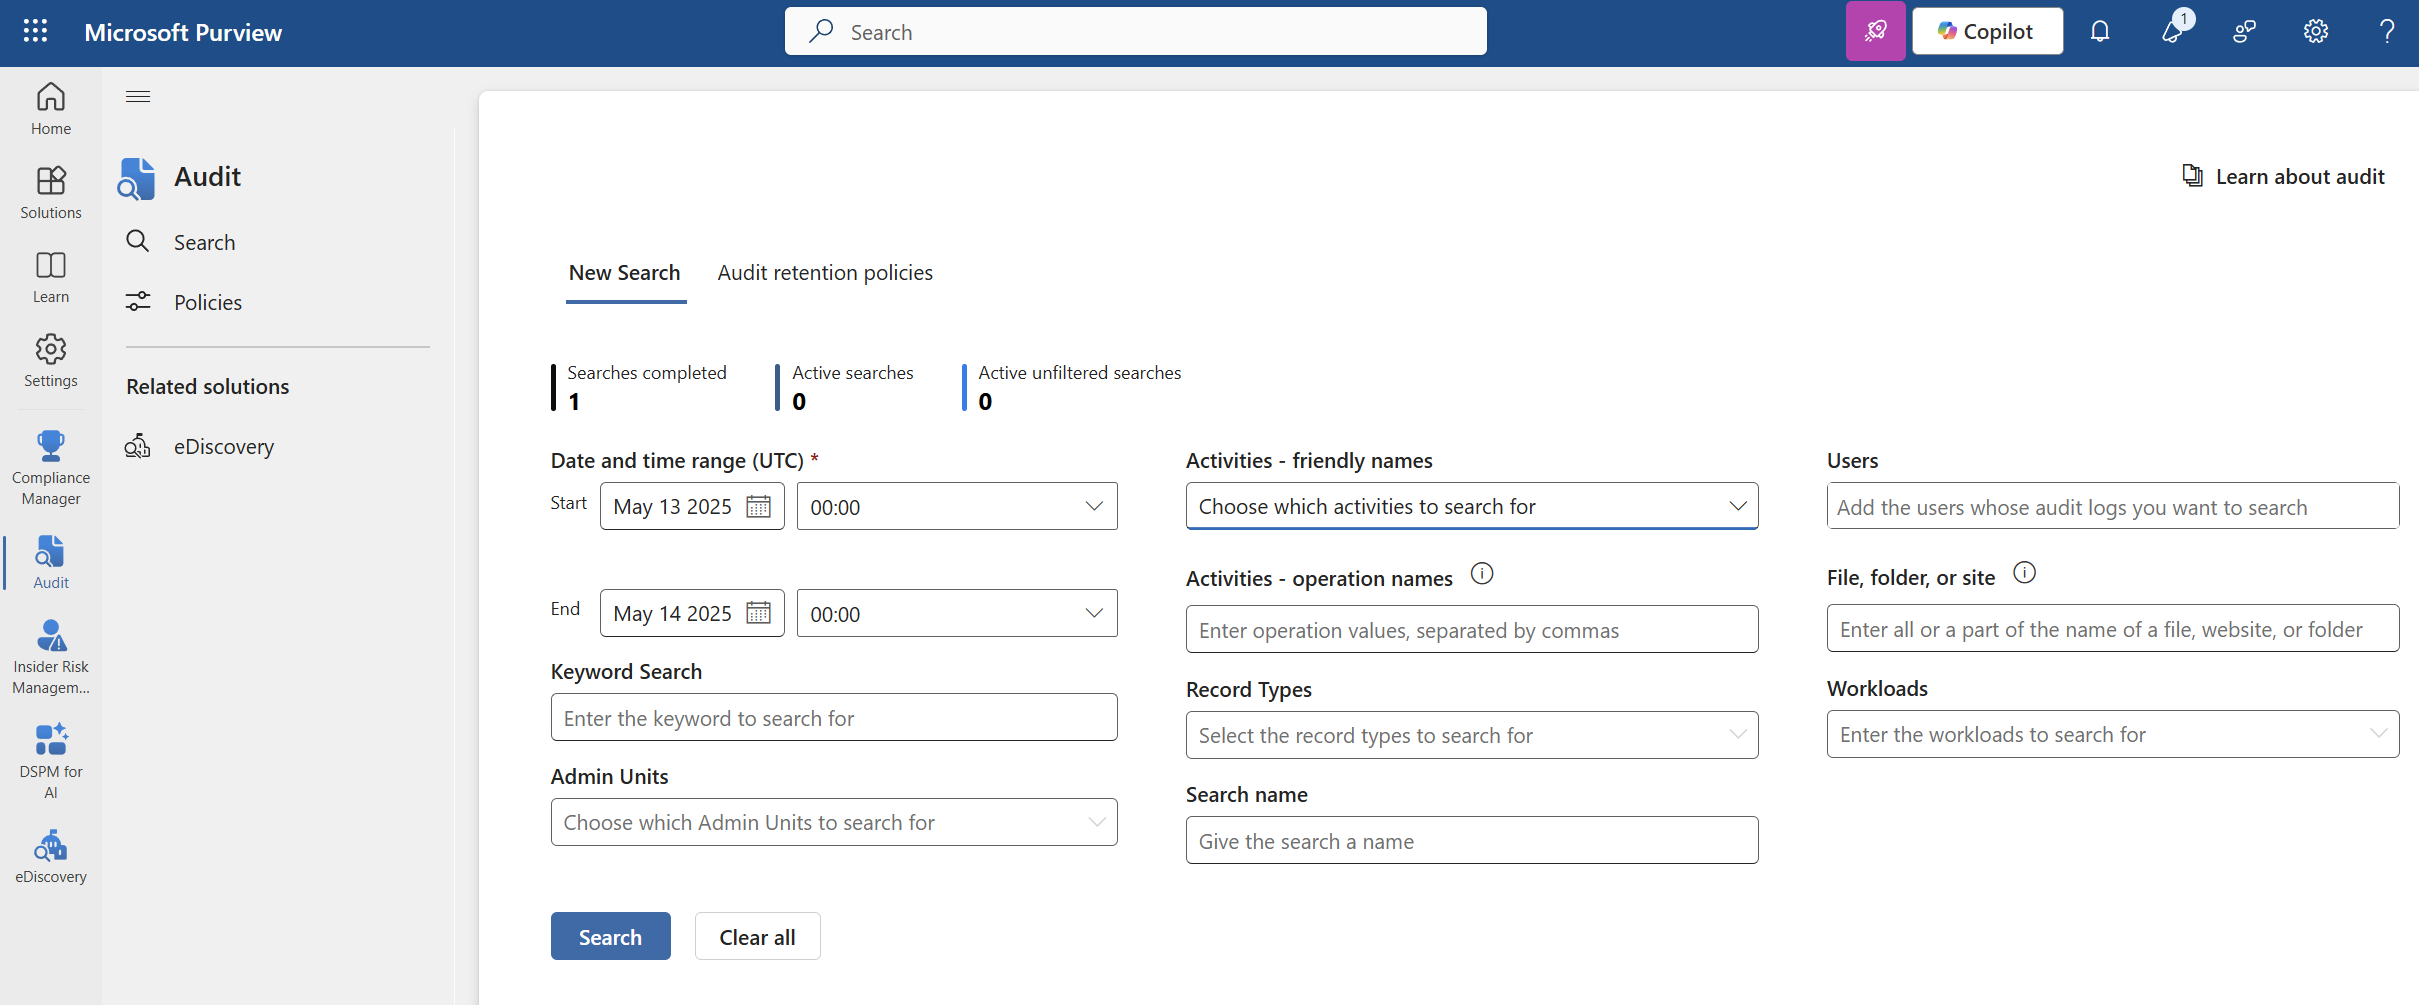
5. Perform an Audit Log Search In Purview
In the Purview admin center, we are now going to perform an audit log search for other potential activities we need to remediate. While you can audit activities, I usually filter for the following to start:
- Inbox Rule Creation (New-Inbox Rule Creation)
- Moved Messages to Deleted Items Folder
- Downloading of Files
- Adding Mailbox Permissions
If an admin user was compromised, you should be auditing all activities performed. Based on the results, perform the following actions
- Remove Any Inbox Rules Created: Remove-InboxRule (ExchangePowerShell) | Microsoft Learn
- If there was email moved to the deleted items folder, it was likely just the attacker covering their tracks for initial access but restore any legitimate emails.
- If files were downloaded, document them and review these with the client in a post-incident summary to understand the importance of information.
- Remove any added mailbox permissions
Recover
1. Re-enable the User account
Now that we have contained the breach and removed any potential access, it is ok to re-enable sign in for the user and inform them accordingly.
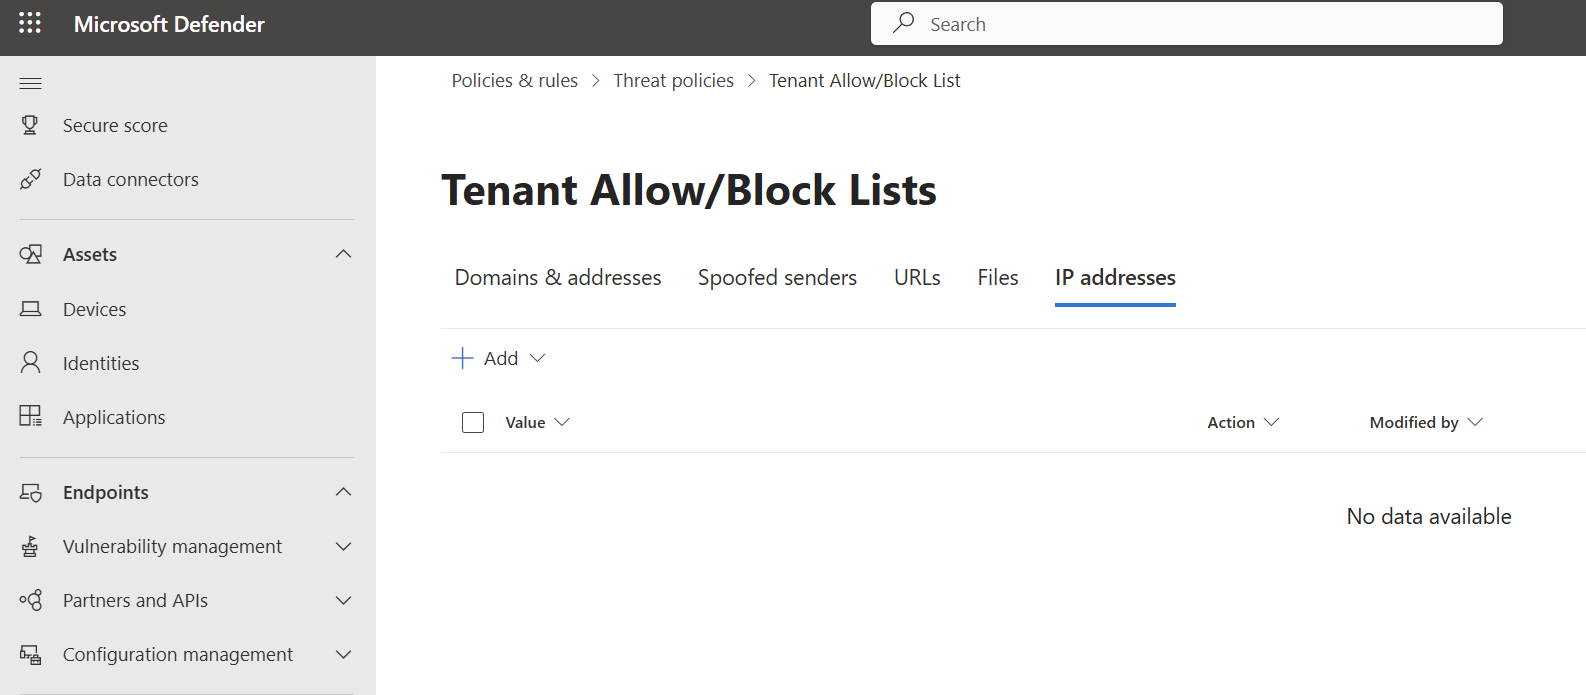
2. Block any Senders, IPs, and report emails to Microsoft accordingly
In the Defender Admin center, block any domains, senders, IPs, URLs, etc. accordingly based on the incident. You can do this in the Defender Admin Center for Email under Email and Collaboration>Policies and Rules>Threat Policies>Tenant Allow/Block List
If you needed to block sign in via a specific IP address, you could set this up as a conditional access policy and leverage Named Locations to start a block list of IPs. Depending on the attack, the better approach may be to start using a geo-restricted policy based on country.
3. Adjust Policies
As part of the retro, its important to review existing policies and any additional hardening that can be done to help prevent these types of attacks in the future. In next weeks post, we will walk through the hardening recommendations for token theft.
4. Share Findings/IR Report
I think its important to share findings of the attack with the customer to show the importance of protections they need to have in place and also reinforce any end-user training.
Bonus: Automated Token Theft Investigation
If you are looking to get an automated way to report on these findings AND implement proactive posture management across customers, check out CloudCapsule. CloudCapsule is an automated Microsoft assessment tool and includes a Token Theft playbook that can immediately surface IOCs for Token theft and provide recommendations for preventing it across your tenants.