
As organizations become more dependent on third-party applications, managing and securing these apps has become increasingly complex. If you’re looking for a streamlined solution to manage and update these applications, you’re in the right place. In this blog post, I’ll walk you through how you can leverage Microsoft Defender and Microsoft Intune to remediate software vulnerabilities across your workstations.
Why is Managing Third-Party Applications Important?
In the past few weeks, we’ve been discussing secure application management, and today, we’ll be focusing on how you can manage third-party apps effectively. Software vulnerabilities, especially in third-party applications, are significant attack vectors that can bypass other security toolsets like Endpoint Detection and Response (EDR) and Anti-Virus (AV). These vulnerabilities often serve as entry points for attackers who can exploit them to gain unauthorized access to devices, compromise user accounts, and cause greater security risks.
However, many Managed Service Providers (MSPs) face challenges when it comes to managing these applications, especially with the unique update cycles and varying complexity across different applications. Today, we’ll dive into some tips and tricks for managing third-party apps using Microsoft Intune, along with auto deployments and updates.
Benefits of Using Microsoft Intune for Application Management
Microsoft Intune offers powerful capabilities that go beyond simply deploying software. By integrating Intune with Microsoft Defender, you can deploy and update software across your entire organization, ensuring your workstations stay secure and up-to-date. Here are some key benefits of using Intune:
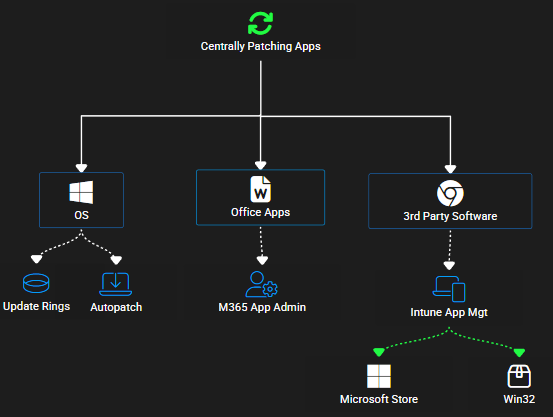
Centralized Management: You can manage all your applications in one place, which improves security and governance.
Auto Deployment and Updates: Once applications are packaged and configured, Intune can handle automatic deployment and updates if the application is from the Microsoft Store. There is a heavier maintenance cost with Win32 apps which we will get into later.
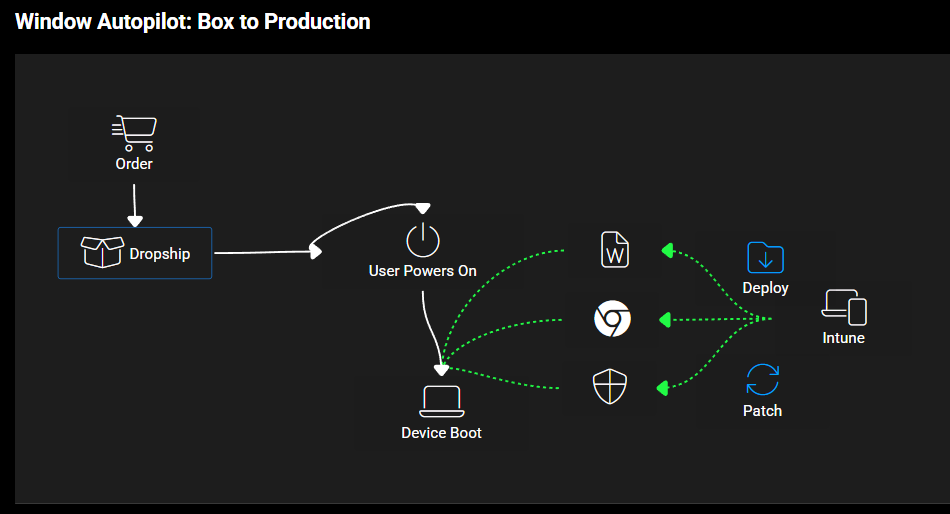
Device Enrollment: With tools like Windows Autopilot, you can automatically configure new devices, deploy apps, and ensure security from day one.
Using Intune to Remediate Software Vulnerabilities
When managing applications through Intune, the goal is to reduce the risk posed by outdated or vulnerable third-party software. Here’s how you can do that:
Automate Application Deployments: Microsoft Intune enables the automatic deployment of third-party applications.
Deploy Software Updates: Just like patching your operating system, you can apply software updates for third-party apps through Intune. By using deployment rings, you can control when updates are rolled out to different user groups, ensuring a smoother experience for everyone.
Manage Legacy Applications: Intune also lets you manage older versions of applications that are still in use. You can deploy the latest version of an app and remove previous versions, ensuring that users always have the most secure and up-to-date version.
Step-by-Step: How to Manage Third-Party Applications in Intune
Step 1: Prepare the Win32 App Package
Before deploying a Win32 app in Intune, you need to package the app using the Intune Win32 App Packaging Tool. This tool wraps the app installer into a .intunewin file that Intune can use for deployment.
Download the Win32 App Packaging Tool from the Microsoft site if you don’t have it already.
Run the tool to package the app:
Select the source folder where the app’s installer (e.g., .exe or .msi) is located.
Select the output folder where the packaged file will be saved.
The tool will create an
.intunewinfile that you can upload to Intune.
Step 2: Add the App to Intune
Now that your app is packaged, you can upload it to Intune for deployment.
Log into the Intune Admin Center: Go to the Microsoft Intune Admin Center.
Navigate to Apps:
In the left-hand menu, select Apps, then All apps.
Add a New App:
Click on + Add, then select Windows App (Win32) as the app type.
Upload the .intunewin Package:
Click Select file, browse to the
.intunewinfile you created, and upload it.
Step 3: Configure App Information
You’ll now configure the app’s basic settings.
App Information:
Provide details like Name, Description, Publisher, and Category.
You can also upload an App Icon and specify the Version of the app.
Install and Uninstall Commands:
Define the Install command and Uninstall command. This is typically the command that runs the installer for the app, such as
setup.exe /quietormsiexec /i app.msi /quiet.The uninstall command is also necessary for Intune to remove the app if needed.
App Requirements:
Set up any requirements (e.g., operating system version, disk space) that must be met for the app to install on a device.
Detection Rules:
Specify detection rules to let Intune know if the app is already installed on a device. You can use MSI product codes, file existence, registry keys, etc.
Return Codes:
Specify the return codes that indicate a successful installation or failure. For most applications, the default return codes will work, but you can customize them if needed.
Step 4: Assign the App to Groups
Now, assign the app to specific device or user groups.
Assign the App:
Choose Assignments to specify which groups should receive the app. You can assign it to Required, Available for enrolled devices, or Uninstall.
Required: The app will be installed automatically on the selected devices.
Available for enrolled devices: The app will be available in the Company Portal, where users can choose to install it.
Set Deployment Rings:
You can assign the app to different rings for phased deployments (e.g., test group first, then broader roll-out).
Step 5: Monitor the Deployment
After the app is deployed, you need to track its installation status.
Monitor Deployment:
In the Intune Admin Center, go to Apps > All Apps.
Select the app you deployed and click on Device install status to see which devices have successfully installed the app.
Review any errors or failures during installation.
Troubleshoot:
If there are issues with deployment, you can use the Intune Management Extension to troubleshoot and see logs from the affected devices.
You can also restart the Intune Management Extension service on the device to force it to check in again for app installation.
See the full tutorial of adding Chrome here:
Wrapping Up
Managing and remediating third-party application vulnerabilities is an essential part of maintaining a secure IT environment. By leveraging Microsoft Defender and Intune, you can streamline application deployments, updates, and security, minimizing risks and improving governance.
For more tips and to take your software vulnerability remediation to the next level, consider checking out Cloud Capsule, a tool that helps MSPs run automated security assessments for Microsoft 365 tenants. You can get instant insights and actionable reports to better manage software vulnerabilities and keep your environment secure.