In a previous article, I discussed initial user compromise with cookie hijacking and the subsequent attacks we could see after. This week, I wanted to zoom in on persistence techniques and talk about the common methods we see in Microsoft 365 today. I also pair these with recommended security baselines (mapped to the CIS Controls) that you can incorporate that you should institute in your customer environments. As you will see, many of these policies are not configured by default.
Quick note on initial access
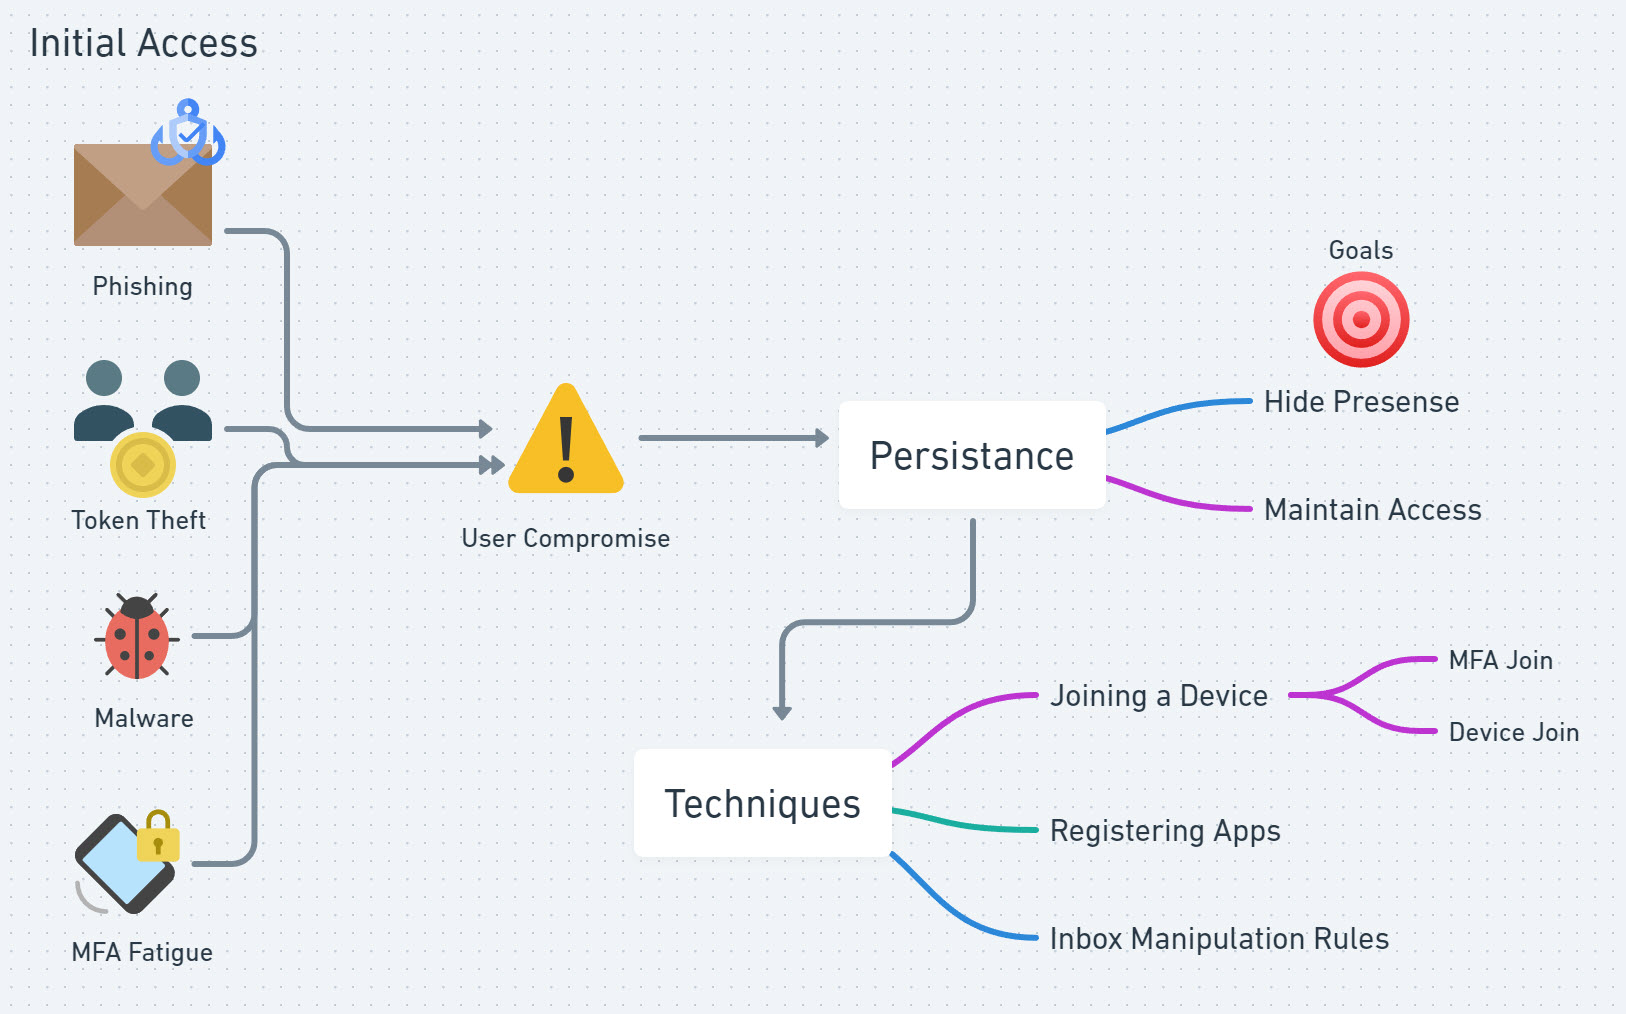
While this article focuses on persistence, its important to note that the initial compromise could come from a number of different attack methods and will vary depending on other weaknesses that you may have in your environment. Here are just a few examples:
- Phishing => Common form of BEC today where a user clicks on a malicious link that could lead to a man-in-the-middle attack or complete user compromise if things like MFA are not enforced for the user today
- Token Theft => session tokens can be harvested either through AiTM attacks or cookie hijacking which can be used to bypass MFA and compromise an account
- Malware => Users devices can be exposed to malware that leads to the account being compromised through various methods.
- MFA Fatigue => Users are prompted with many MFA request after credential compromise which they accept and have their account compromised. Number matching has certainly helped here but this MFA method is still prone to social engineering.
Attackers will achieve persistence by hiding their presence and maintaining their access. They do this to buy time in most cases to perform some time of higher-level goal. Achieving persistence allows them to move across the attack chain to do things like the following:
- Perform reconnaissance
- Move laterally
- Elevate privileges
- Perform another campaign
Here are the 3 persistence techniques I am going to be discussing today:
- Joining a device/mfa method
- Registering Applications
- Creating Inbox Manipulation Rules
Joining a Device or MFA Method
Adding an MFA method
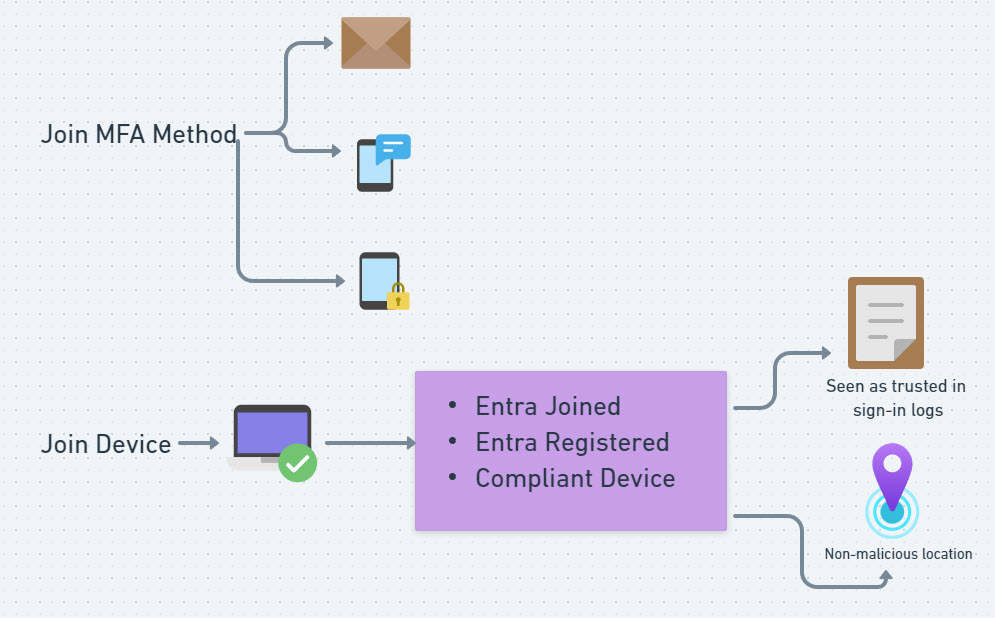
If the user was compromised because they have no MFA, the attacker doesn’t have much of a hurdle to maintain their access initially. For users with MFA that were compromised, attackers will often try to add another MFA method to the account. If they used attacks like AiTM or token theft, they will still only have a limited amount of time where that session is going to be good for so its important that they maintain their access after the session expires. The attacker will look to add a second factor like SMS, email, or more commonly OTP on Microsoft authenticator. This will allow them to continue to sign in.
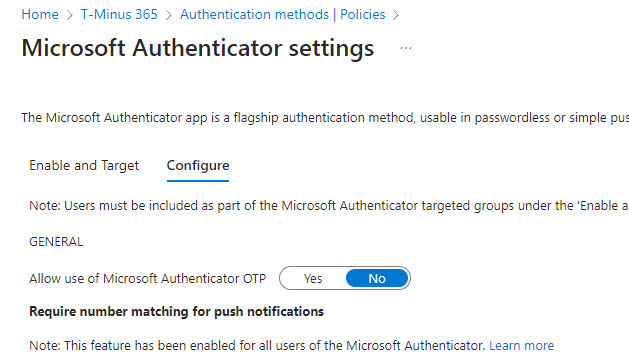
1. Modify your Authentication Methods Policy
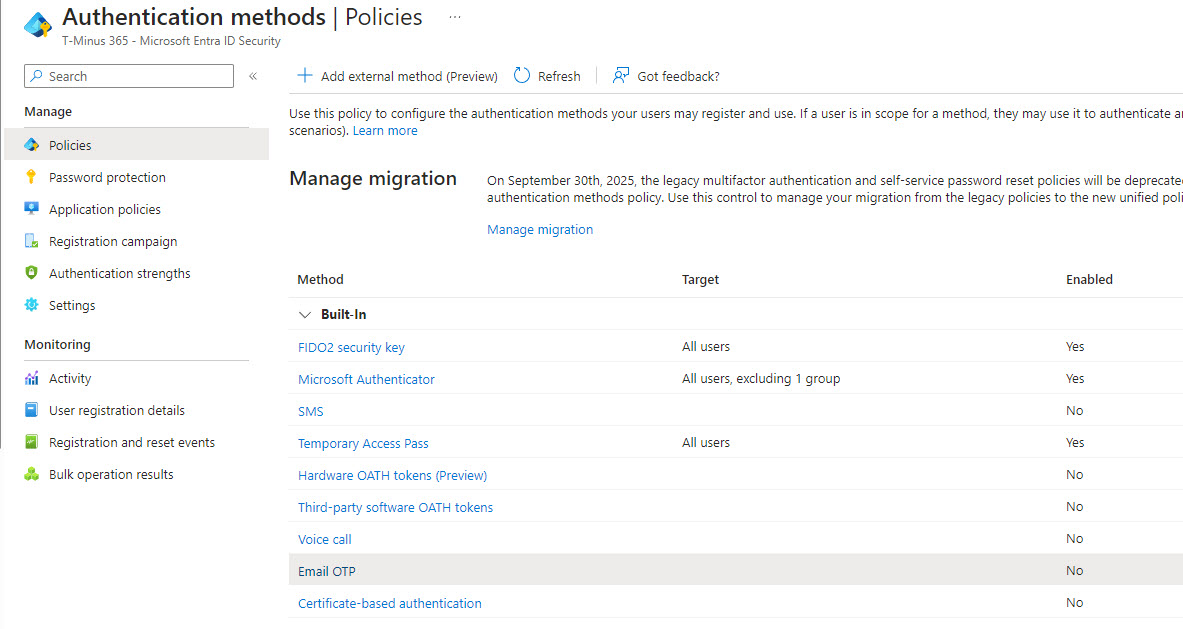
You should modify your default settings in the Authentication methods section of Entra. I always recommend disabling SMS, Email, and Phone as these are considered weaker forms of MFA. From a logging perspective, “PhoneAppOTP” represents Microsoft Authenticator OTP and it is a more popular method for attackers to add given that the additional metadeta shows DeviceName as NO_DEVICE and DeviceToken as NO_DEVICE_TOKEN
Most of us have moved to number matching so I recommend disabling OTP on Microsoft Authenticator as well.
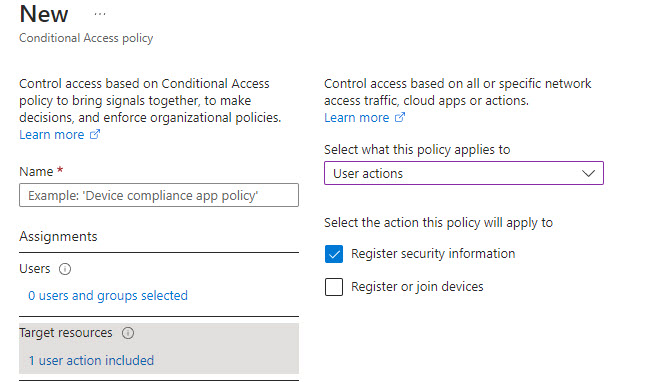
2. Create a Conditional Access Policy to Require Additional controls with additional MFA registration
Within Conditional Access Policies under Target Resources, you can choose “User Actions” From the dropdown. Here you can select Register Security information to indicate a user taking actions to add an MFA method or configure settings for self-service password reset.
There are a few things you can enforce here so I just wanted to provide examples:
- Require MFA in the grant controls => Require MFA to enroll MFA? Yes. This would simply ask the user to fulfill another MFA prompt to set up another method which would stop attackers if they got access through token theft. Even if they used MFA fatigue, they would have to do that again. Keep in mind with this option, you would have to start issuing Temporary access passes out to net new users to the org as part of their onboarding process.
- Require a Trusted Location => You can set up trusted locations and require that a user be on that IP/country to register an MFA method. While harder to do in a remote workforce, even saying they can only be registered from within certain countries gives you more protection
- Require a Compliant Device or Managed Device=>If you have devices enrolled into Intune or have devices Entra ID Joined/Hybrid Joined, you could require that the user be on one of these devices to set up another MFA method.
3. Perform Threat Hunting and Investigation
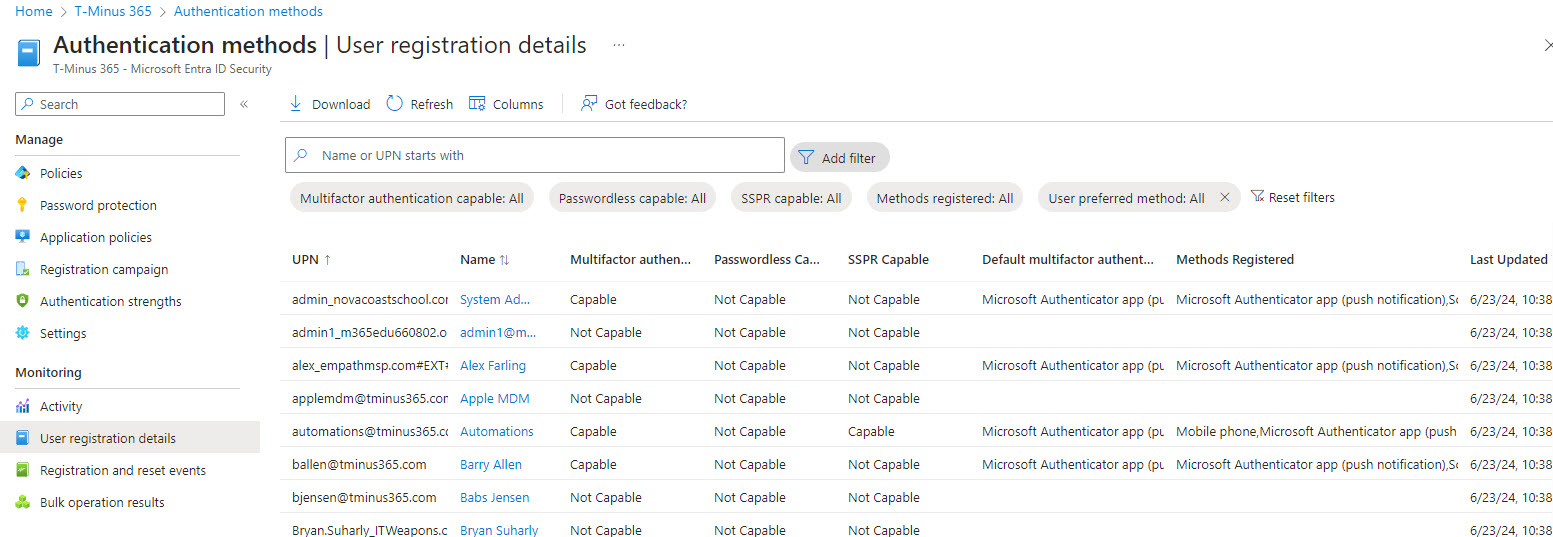
If you believe a user has been compromised, you can investigate the logs to determine if another MFA method has been added. Within the Entra admin center, you can view the User Registration details (Protection>Authentication Methods>User Registration Details) to see an audit trail of these activities.
Additionally, you can use Microsoft’s KQL language to perform threat hunting in Entra or Defender. Here is a recent article that provides great detail and KQL queries you can use to investigate.
Adding a Device
We have to keep in mind that an attacker might want to keep persistence for months. In order to hide their presence, they will often look to add a device to the network to make it seem as if its a trusted device. If they join a device with the compromised users credentials, it could be Entra ID Joined/Registered and potentially show up as a compliant device in Intune. With these things in mind, its less likely to get flagged as risky activity with the native protections in Entra. From an IP perspective, its possible the attacker is in the US or using a VPN to mask the actual IP they are coming from making it harder to detect this anomaly in the sign in logs.
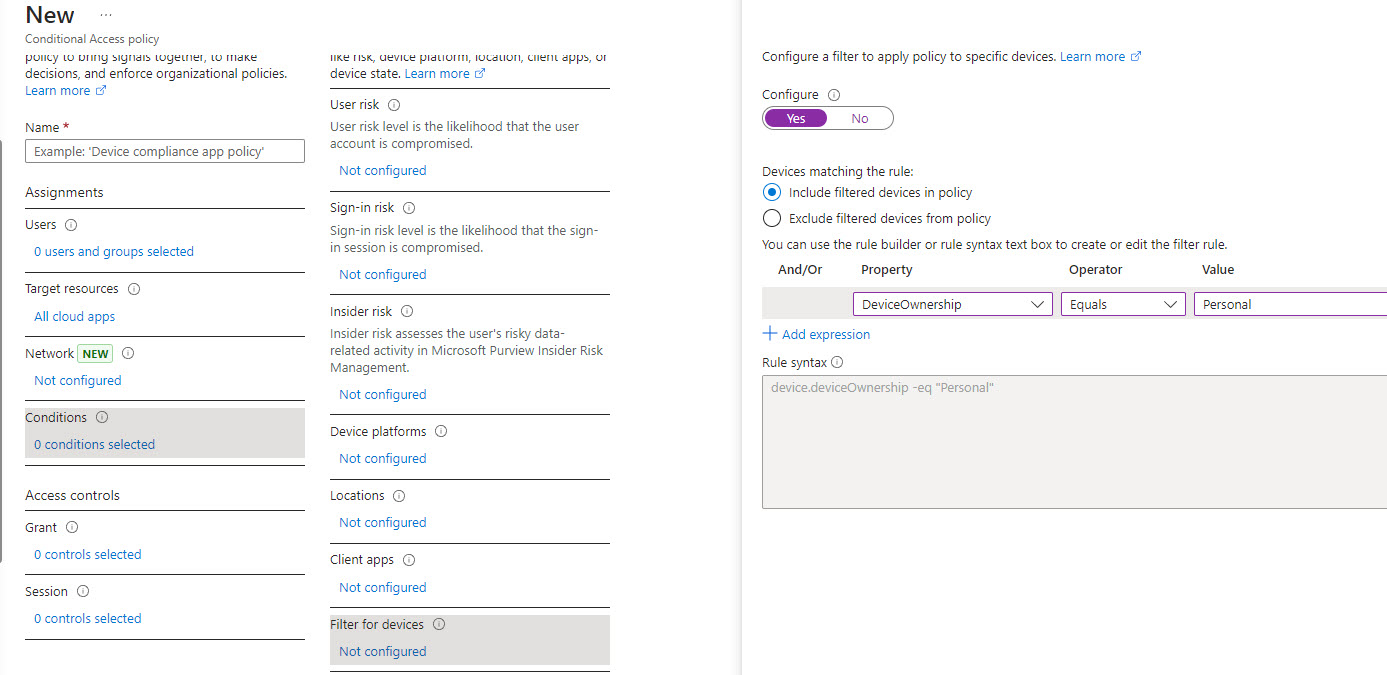
1. Add a conditional access policy to provide additional protections for device registration
Much like I discussed for MFA registration, the same User Actions settings in conditional access policies can be used to add protections when users join devices.
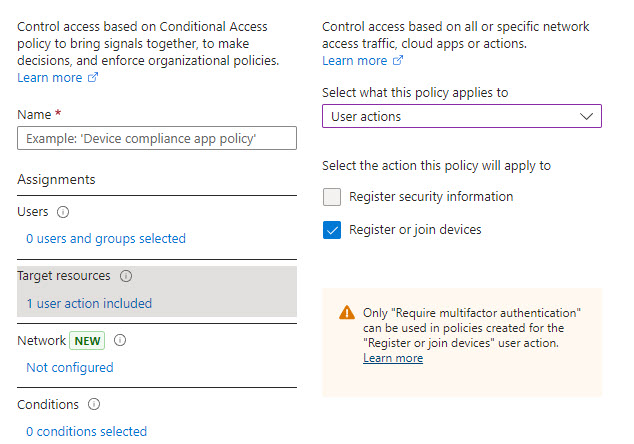
Requiring MFA and/or a Trusted location to register devices could be a great way to prevent against these devices being registered.
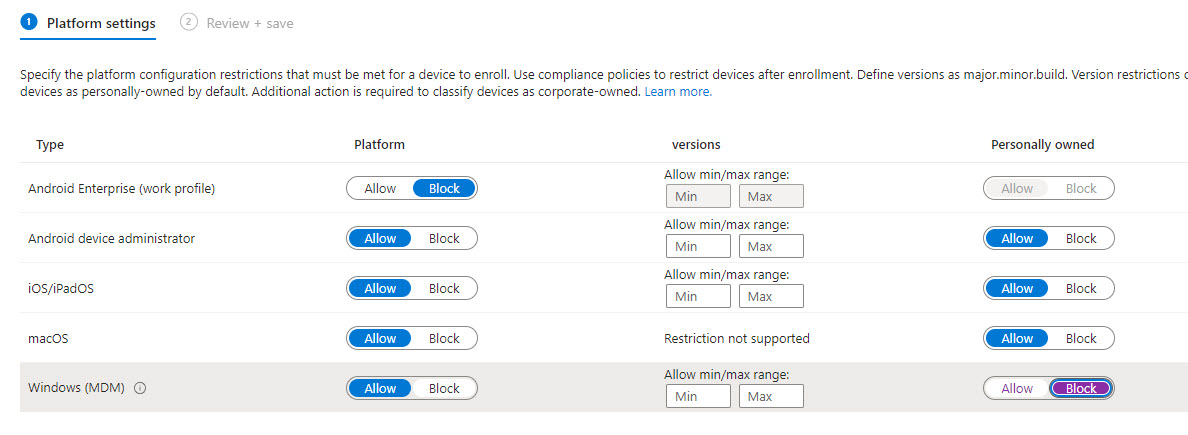
2. Only Allow Coporate approved devices
Through a combination of settings in Intune and Conditional access policies, you can ensure that only corporate approved devices are joined to the network. In a conditional access policy you would block personal devices:
In Intune, you can block Personal devices from enrolling into the MDM solution:
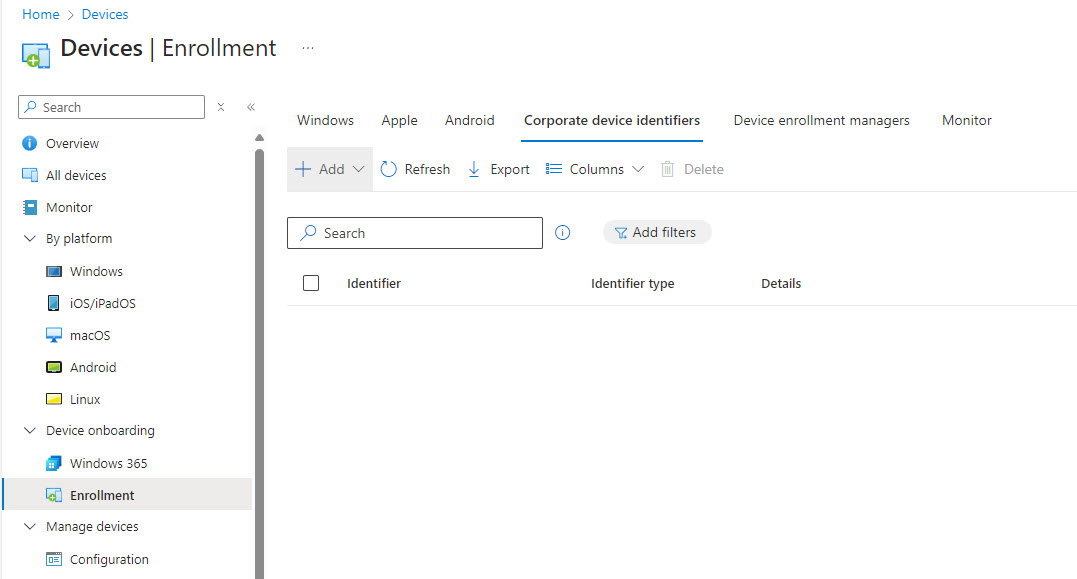
And if you wanted to get more granular, you can leverage corporate device identifiers to specify corporate devices based on their serial number
3. Hunting and Investigation
The following is a KQL query you can leverage to hunt for rogue devices:
 // Hunting for rogue device registrations
let startTime = ago(7d);
let endTime = now();
CloudAppEvents
| where Timestamp between(startTime .. endTime)
| where ActionType == "Add registered owner to device."
| where RawEventData contains "notorius"
| where AccountDisplayName == "Device Registration Service"
| where isnotempty(RawEventData.ObjectId) and isnotempty(RawEventData.ModifiedProperties[0].NewValue) and isnotempty(RawEventData.Target[1].ID) and isnotempty(RawEventData.ModifiedProperties[1].NewValue)
| extend AccountUpn = tostring(RawEventData.ObjectId)
| extend AccountObjectId = tostring(RawEventData.Target[1].ID)
| extend DeviceObjectId = tostring(RawEventData.ModifiedProperties[0].NewValue)
| extend DeviceDisplayName = tostring(RawEventData.ModifiedProperties[1].NewValue)
| project Timestamp,ReportId,AccountUpn,AccountObjectId,DeviceObjectId,DeviceDisplayName
Registering Applications
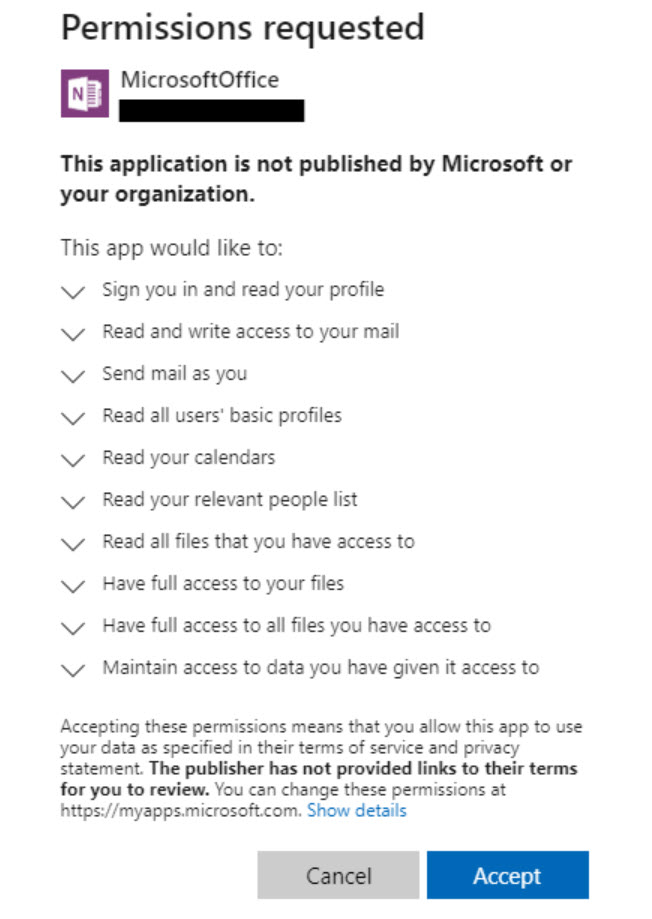
Service principals, better known as Enterprise applications in this use case, are a popular way for attackers to both achieve persistence and elevate their privileges in an account. After an attacker has compromised a user, if the tenant settings are not configured correctly, they can grant consent to an application which provides them privileges they need to do things like read users mailbox and send mail on their behalf. The key thing to note here is that they can now do this programmatically, without needing the users credentials to perform this action. They use the service principal as the identity of record to perform these actions. Two of the most common apps you will see are:
- eM Client
- PerfectData
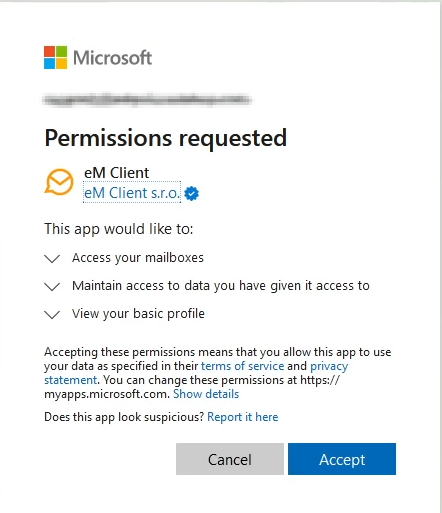

In many cases of users compromise, the attacker will leverage both of these apps simultaneously to maintain persistence. Another key thing to note here is that these apps are considered legitimate, verified publishers so they aren’t seen as malicious in the Microsoft ecosystem even though they are used to perform malicious activity in most situations. You will also see non-legitimate apps that attackers will also leverage as part of phishing campaigns:
1. Modify your Entra Policy
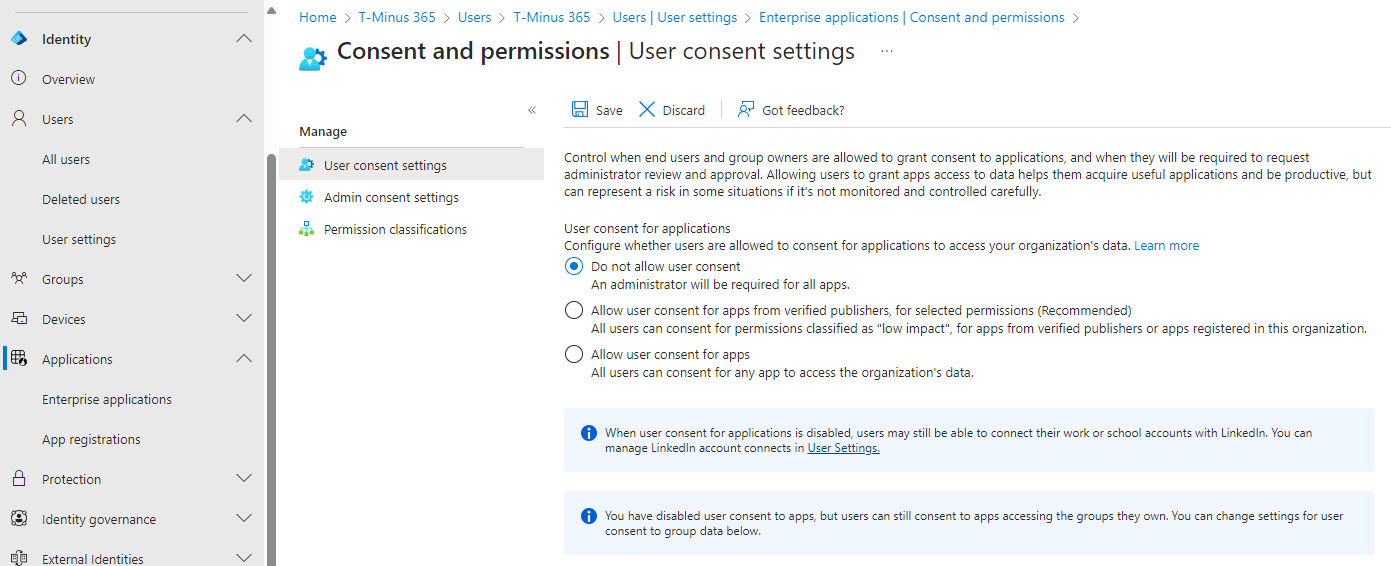
In Entra, you need to modify your User consent settings (Applications>Enterprise Applications>Consent and Permissions) to not allow user consent. Note, I do not like the second option of having a approved publisher given the examples above. Users should be coming to you to review these apps and their permissions.
2. Hunting and Investigation
Microsoft has a great article here that details what you can do to investigate with the audit log records available.
Creating Inbox Manipulation Rules
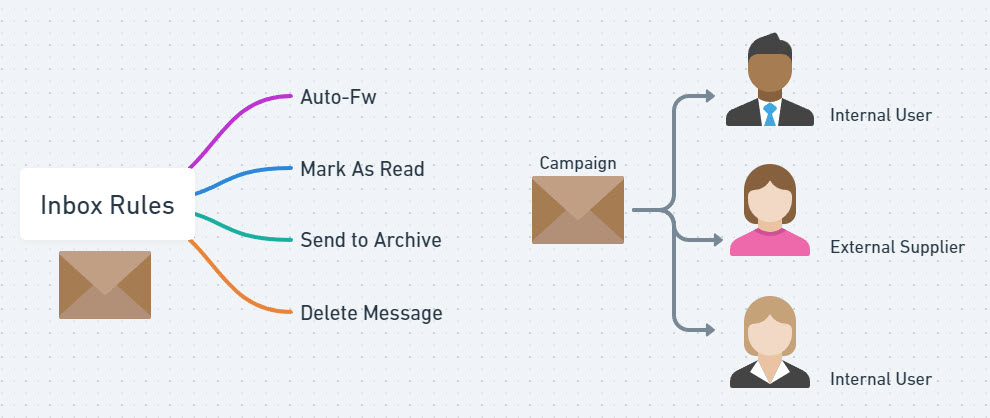
After initial user compromise, an attacker will often:
- Delete/Remove evidence in an inbox of their initial attack
- Set up mailbox rules to hide their presence
Depending on their goals, they will often start another campaign to target other users (internal or external) now that they can send from a legitimate email. They will often set up more inbox rules to avoid the legitimate user from seeing messages they are sending out to other users and/or auto-replies for non-deliverables, auto-generated security notifications, etc.
1. Connect Suspicious Inbox Alerts to PSA
If you have Defender for Office 365 Plan 1 (comes with BP), there are native alerts that get created for suspicious inbox activity:
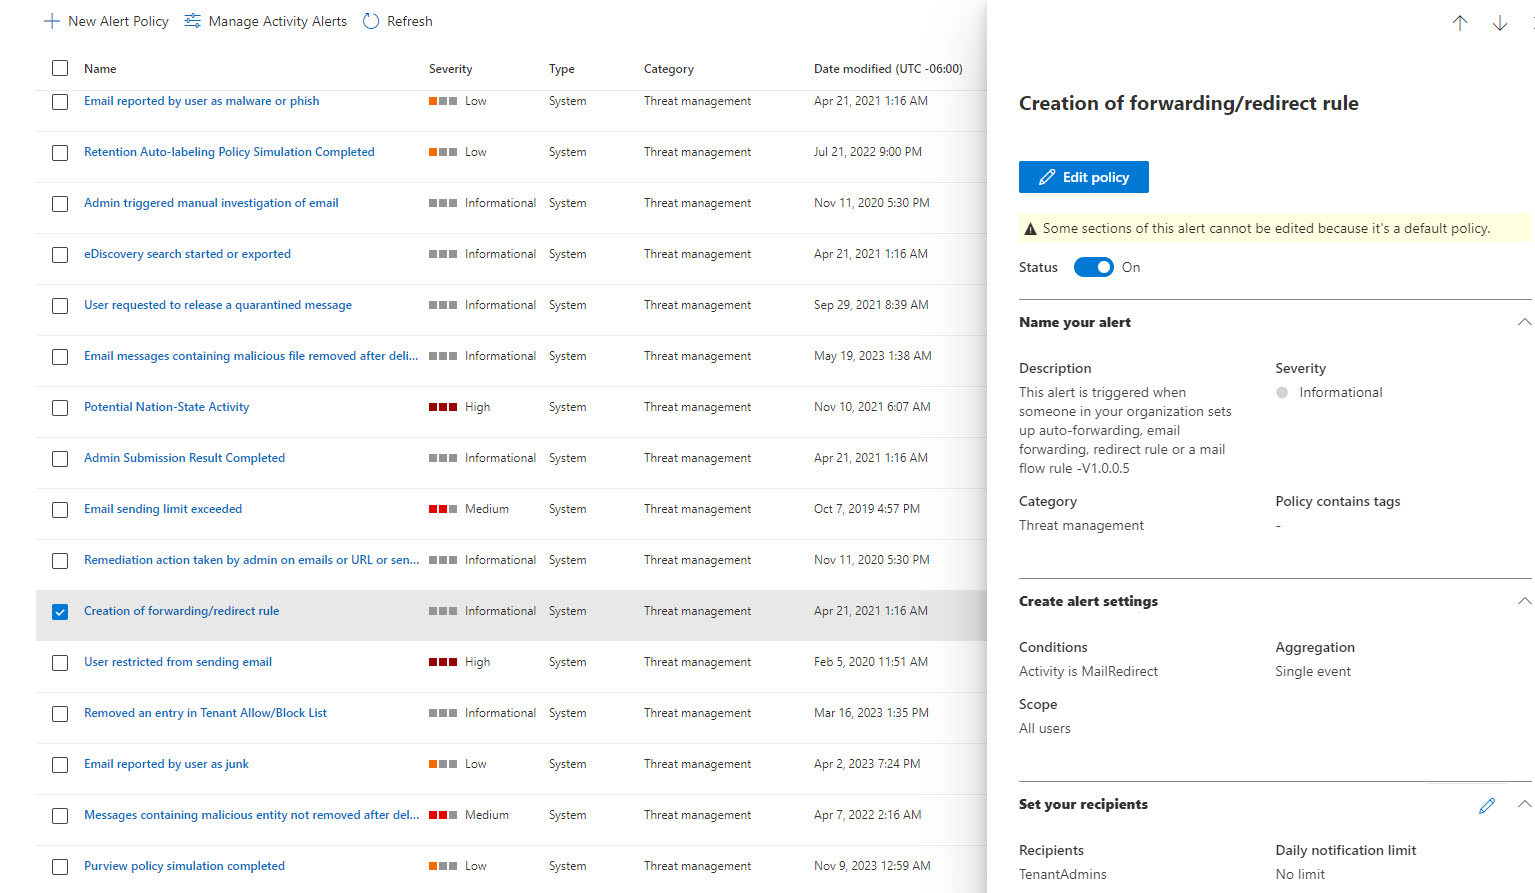
By default, they only go to the tenant admins in the account. You can redirect these alerts to your PSA tool via an email connector.
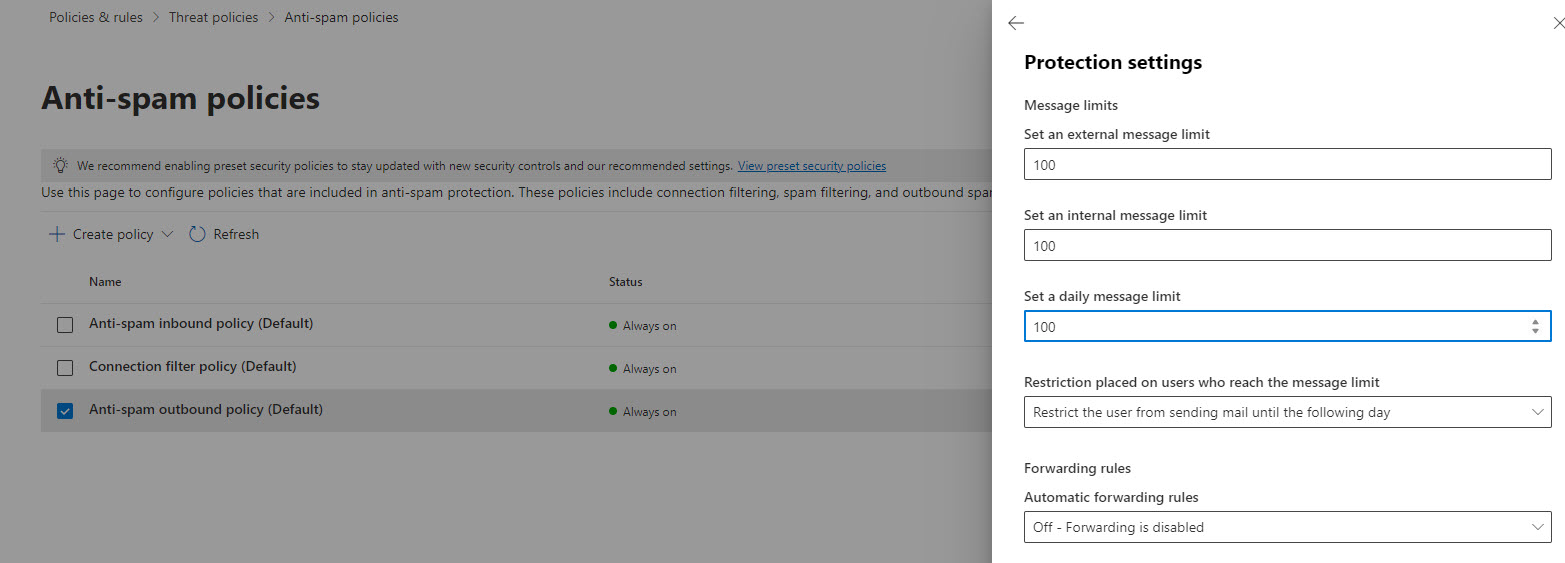
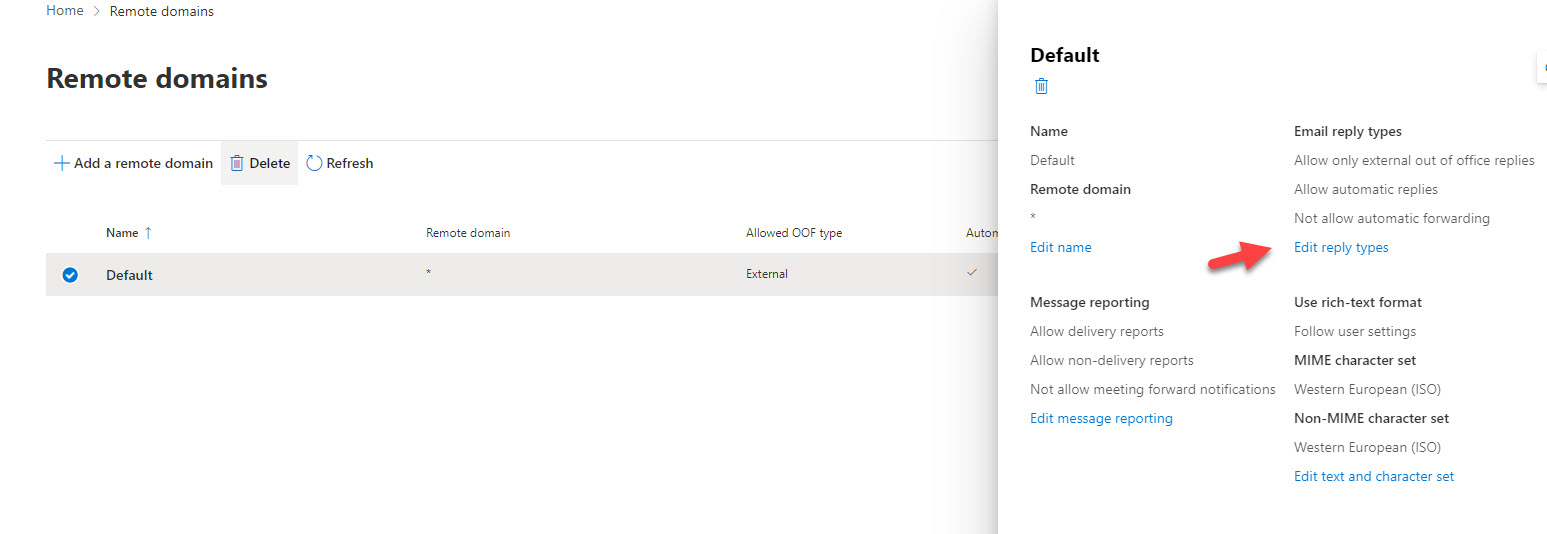
2. Prevent auto-forwarding to external domains
This has been a long-standing security default recommendation. This setting can be modified:
- In the default anti-spam outbound policy (Defender Admin center)
- In the Remote domains policy (Exchange Admin center)
- Through transport rules
Conclusion + Additional CIS Resouces
I hope this article was helpful in providing some targeted guidance on protecting against persistence techniques in Microsoft 365. If you are interested in more of my CIS mappings, check out his content:
1. Free CIS Self-Assessment Mapped to Microsoft 365
2. CIS to M365 E-book and Mult-tenant Power BI template
3. Automated M365 Assessment mapped to the CIS Controls
I’ve built an automated assessment tool that you can run against a M365 tenant to automate the pass/fail values of the CIS controls across M365 security recommendations based on the existing configuration.